click for youtube video:
(audio is important, and try to watch in 4k fullscreen
even if you have a 1080p monitor – the 1080p and lower video is chunky)
eternal apex //
an ambient (no goals, just cruising), high speed, futuristic tunnel racer prototype
An impromptu game design challenge over a few late nights recently to better wrap my head around:
World origin shifting to seamlessly offset player and world geometry every 100k units in direction of player movement indefinitely
World position offset in the materials for road, walls, and ceiling (including emissive light bar) to curve tunnel into the distance; updated offset target over time depending on player velocity to gradually change curve; used same formula in blueprint to update position of ceiling point lights to match emissive light bar mesh
Single instanced static mesh for all towers and overpasses, procedurally sized and positioned at runtime
Tunnel segments procedurally placed at runtime randomly chosen from preset patterns (fully enclosed tunnel, open-sided tunnel, open-roofed tunnel, arches, etc)
24 fps gameplay: this topic is contentious, but I’m a cinemaphile and love the 24fps cinematic “look” – however most games feel very jerky and unresponsive at such a low framerate, so I designed motion and input from the ground up to look and feel smooth and natural at this more film-like framerate (although it’s still possible to play at 60fps or higher with a toggle)
Sadly my modeling and texturing skills are lacking, so for the sake of rapid prototyping:
Motorcycle and all level geometry were made in blueprints from stock spheres and cubes
All textures and materials are very basic, using stock concrete texture and simple road stripes overlaid
Headlight and taillight are just point lights using in-engine IES profiles
Desktop looks and feels very good, but I’m still working on mobile support for the learning experience:
even on my “high end” mobile device (Android), dynamic lighting support is very limited, so I’m currently attempting to find a way to “paint” the headlight and taillight beams into the road/wall/ceiling materials
postprocessing is very limited, so motion blur, bloom, depth of field, etc are worse or nonexistent
However, performance is good, and touch/tilt/cam rotation controls feel very good.
I have a BP_Pawn blueprint which contains the bike and player logic, and a BP_WorldSpawn blueprint which is the parent of all the world geometry (road, walls, towers, overpasses), and manages spawning and reusing world geometry.
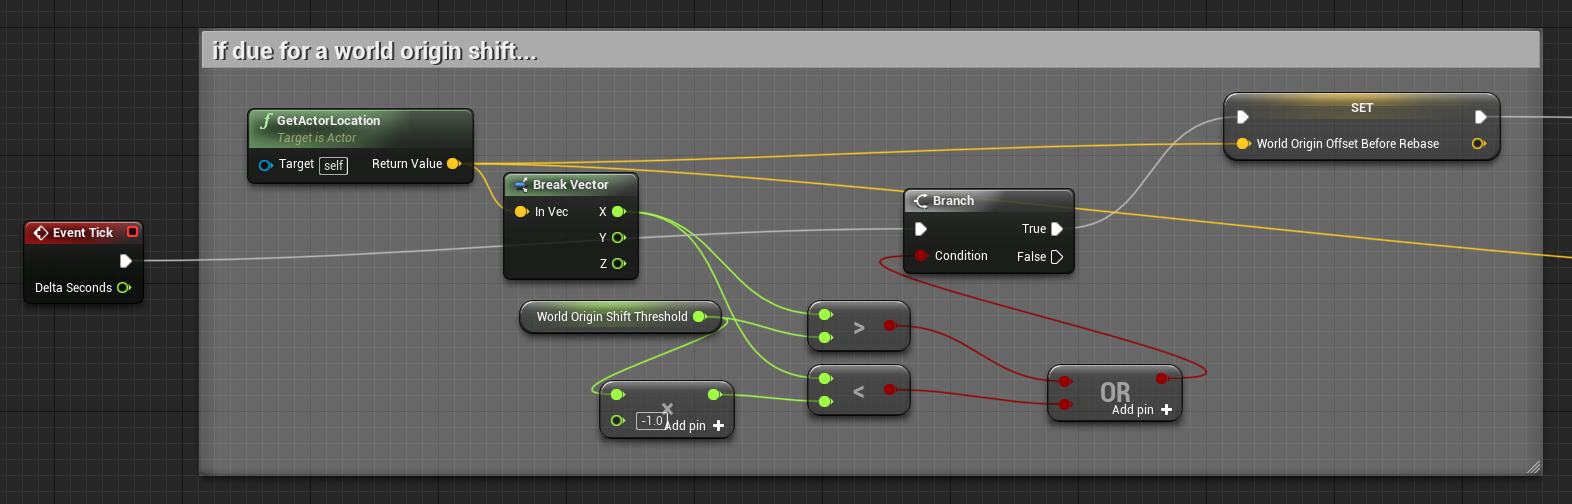
In BP_Pawn, on Tick, check to see if we’ve passed a predefined World Shift threshold (I set this variable to 100000 for testing, but this should be set to less than where you start seeing floating-point precision errors). Note that my game’s player moves along the X vector in world space – make sure you change this if your game’s orientation is different. Also save the BP_Pawn actor’s current location as we’ll need this later:
In BP_Pawn, set the new World Origin Location to the current world origin location (this will start at 0,0,0 and change each time we do a world origin shift) plus current BP_Pawn actor location. Note that you must truncate floats to ints, and manually break apart and add the Int Vector x,y,z components (there’s no built-in blueprint function for adding Int Vectors). I’ve also flagged a boolean WorldOriginShiftInProgress variable to prevent certain updates elsewhere in my code – this may be applicable in your case if you get 1-frame glitches (geometry moving/freezing unexpectedly) during world origin shifting.
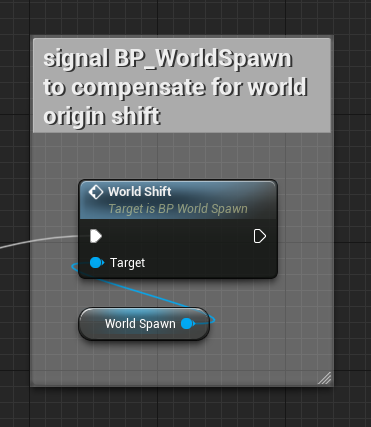
Finally in BP_Pawn, call a world shift update event we’ve created in BP_WorldSpawn (explained below):
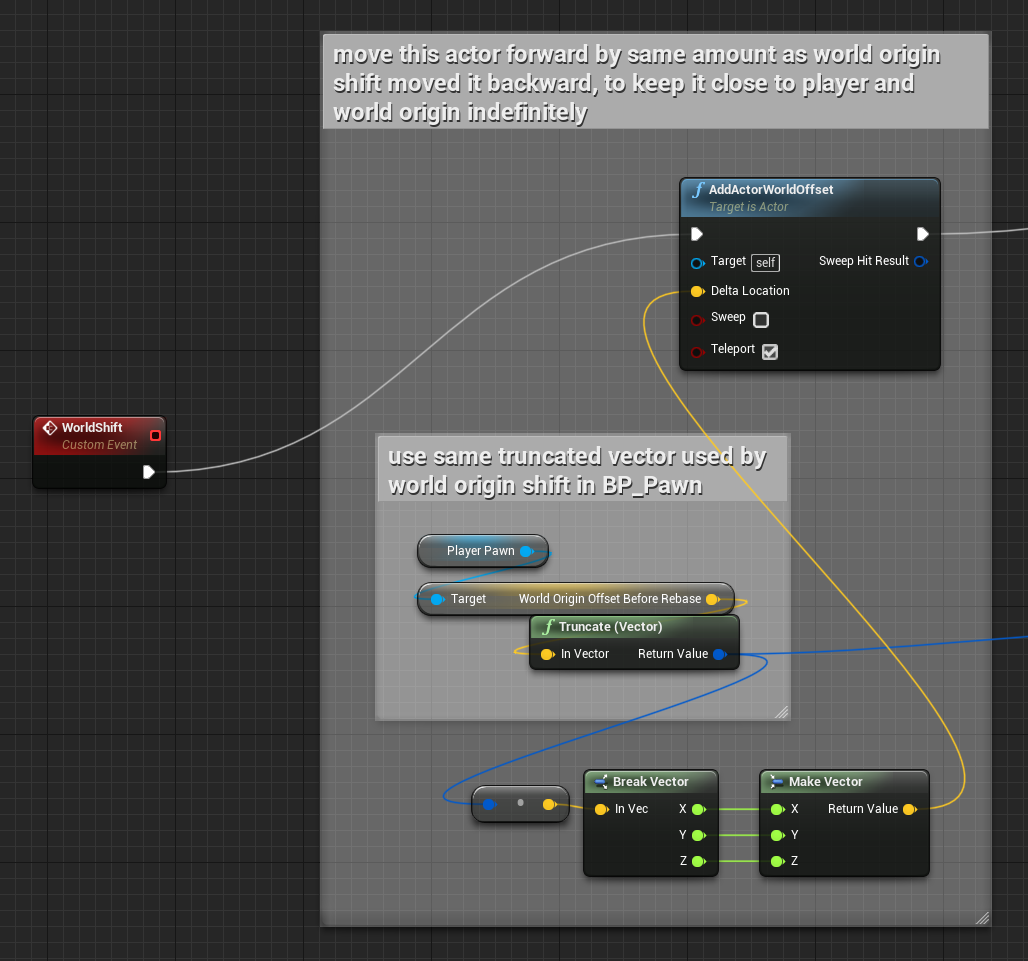
In BP_WorldSpawn, handle the WorldShift custom event: move the BP_WorldSpawn actor (which is the parent of all world geometry) forward to compensate for having just moved everything backward as a result of the world origin shift location change. Note that I’m using the exact same truncated vector value I saved previously in BP_Pawn, in order for everything to line up seamlessly. (NOTE: ignore the superfluous BreakVector feeding directly back into a MakeVector in this screenshot, it’s harmless but not necessary – I was originally tweaking the values while trying to experiment with some glitches I was having earlier in development)
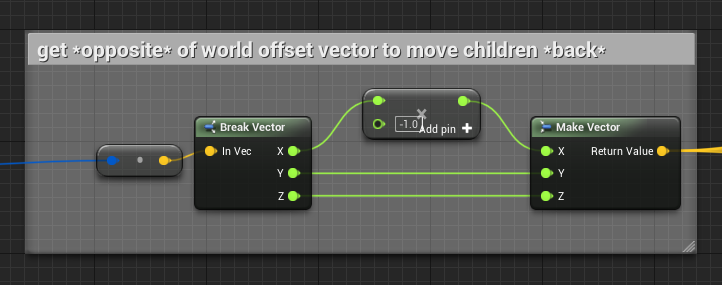
Get the opposite of the direction we’re moving the BP_WorldSpawn actor (along the X vector in world space in the case of this game, but this will depend on your game’s orientation):
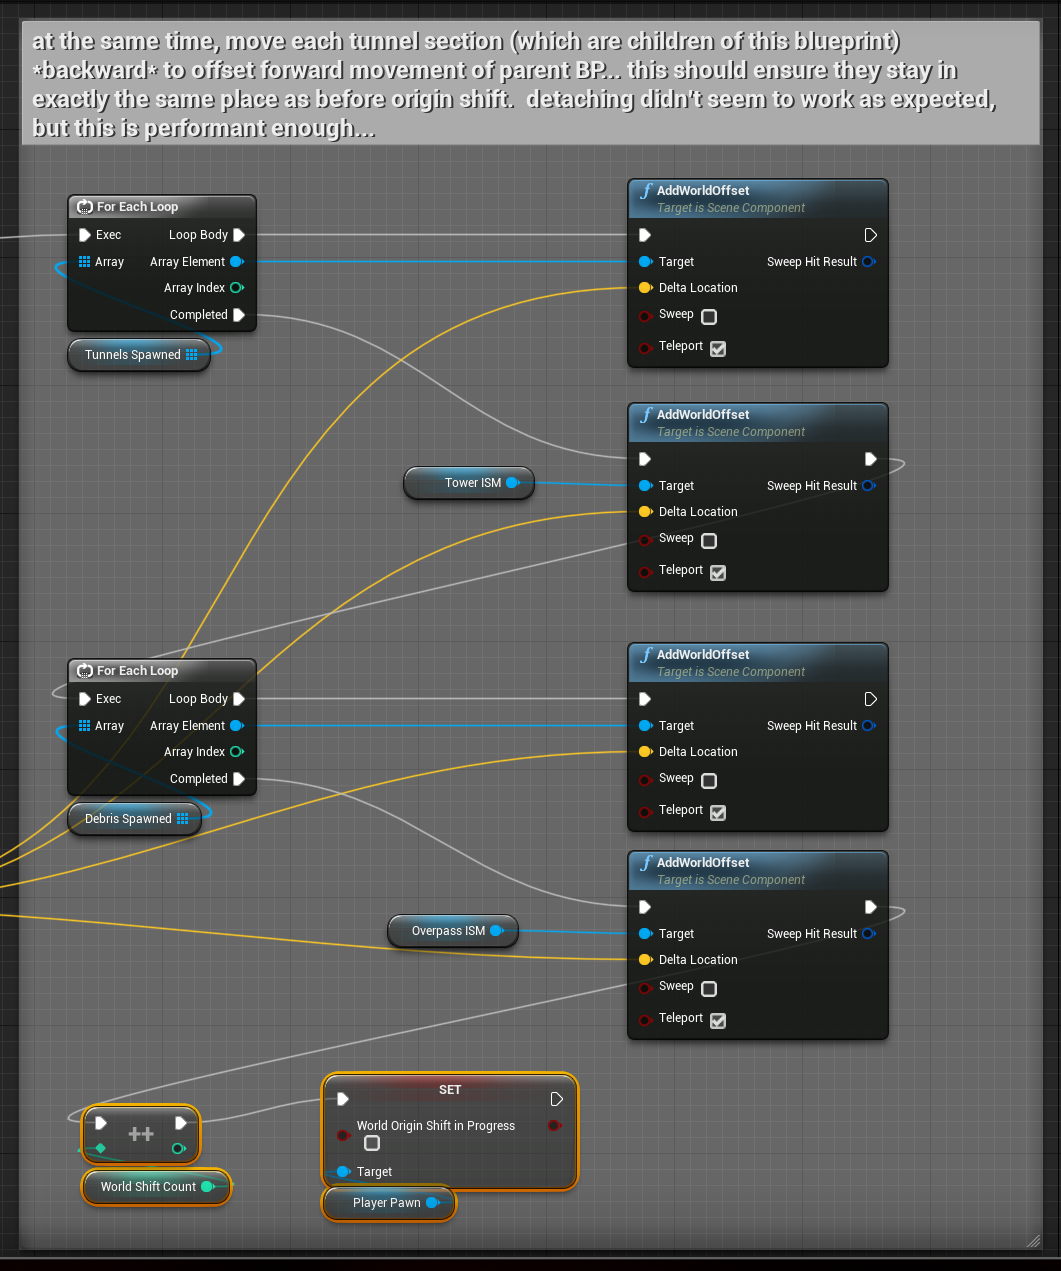
Finally, move all child components (this is all the world geometry: road segments, walls, towers, overpasses) in the opposite direction that we just moved the BP_WorldSpawn parent actor that contains them, by adding the same negative world offset to each. Some of these are just mesh scene components (which I’ve stored in arrays as they were spawned), and some are Instanced Static Mesh components which contain collections of instances (all parented to the ISM component). Note that I spawned all level geometry at the beginning of the game, and simply reuse the same pieces over and over by showing/hiding/moving them, in order the save the processing and garbage collection overhead of spawning and destroying components.
In summary, this all seems overly complex, but basically:
Increment the World Origin Location by a threshold we define (whatever amount is safely less than where we start seeing floating point math errors). This is a hidden Large Int (int64) value used by the engine as a location offset for very large worlds: each time we change it, everything in the game seamlessly moves by that amount. It all appears to be right where it was previously relative to everything else in the world, but under the hood the absolute position has changed.
Move any applicable actors to compensate, if needed. An “endless runner” is a rather different case than say a large open world exploration game: In this case, I have an invisible world geometry parent actor (BP_WorldSpawn) which will gradually get left far behind. So I want to keep moving it on each world origin location change to keep up with the player actor, no matter how far the player gets from the original (hidden) World Origin Location 0,0,0 we started at. However, since we’re moving the parent BP_WorldSpawn actor, we then need to move all the child geometry components within it backward (the opposite of the direction we just moved the BP_WorldSpawn actor forward) so that everything appears to be in the same place.
This results in everything calculating correctly, moving seamlessly, correct physics, no graphics glitches or memory leaking, even after many hours of letting it run, and thousands of world origin shifts.
How to spawn and endlessly reuse/reconfigure the same set of road segments, to avoid the overhead/garbage collection/memory leaks of endlessly creating/destroying identical modular child actor components uncountable thousands of times (in the case of running the game at high speed for hours).
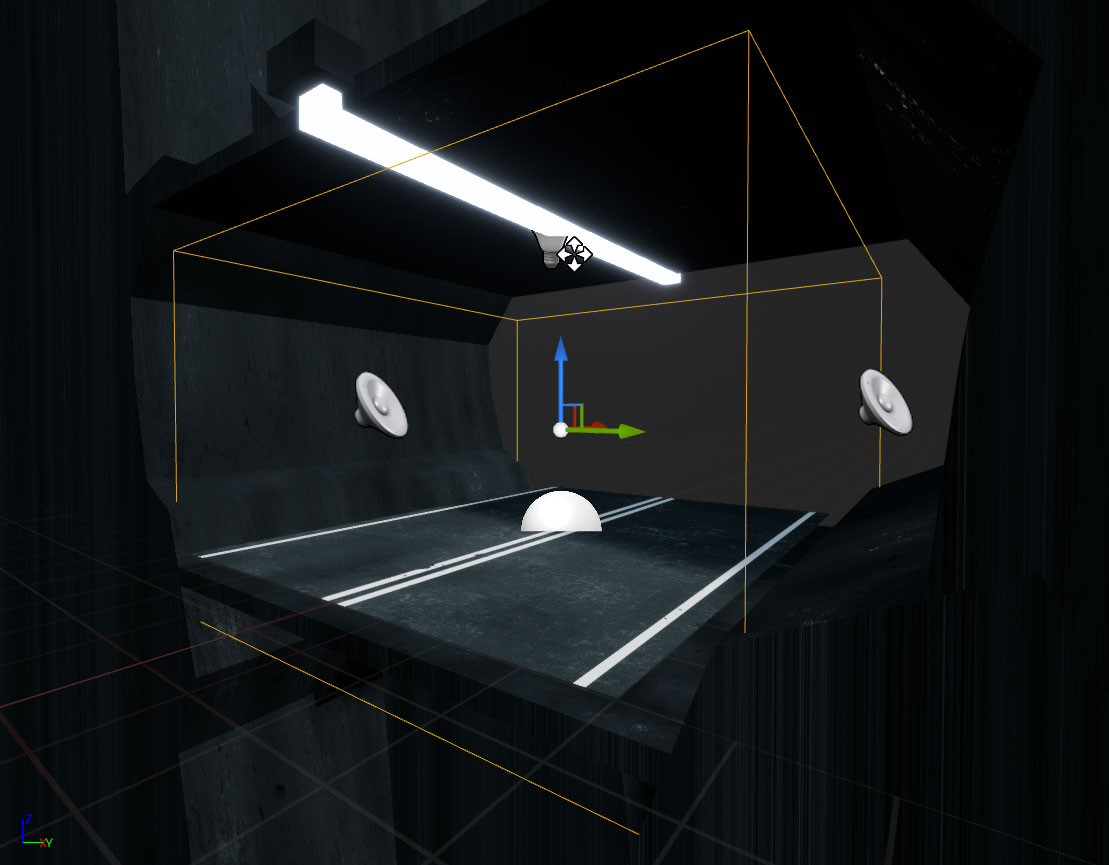
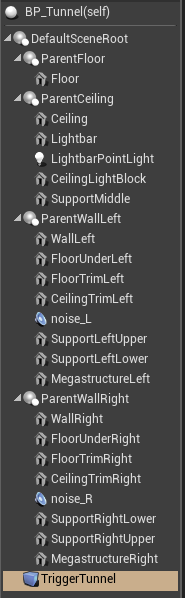
Each road segment is an Actor blueprint named BP_Tunnel. This blueprint doesn’t have any logic, it only defines separate component meshes for the road, walls, ceiling, lights, etc, plus a point light emitter on the ceiling, and a trigger volume (highlighted here in yellow) that the player bike is guaranteed to pass through:
Each segment is made up of separate component parts to allow different predefined configurations, which are selected each time a segment is reused by hiding/showing the necessary pieces:
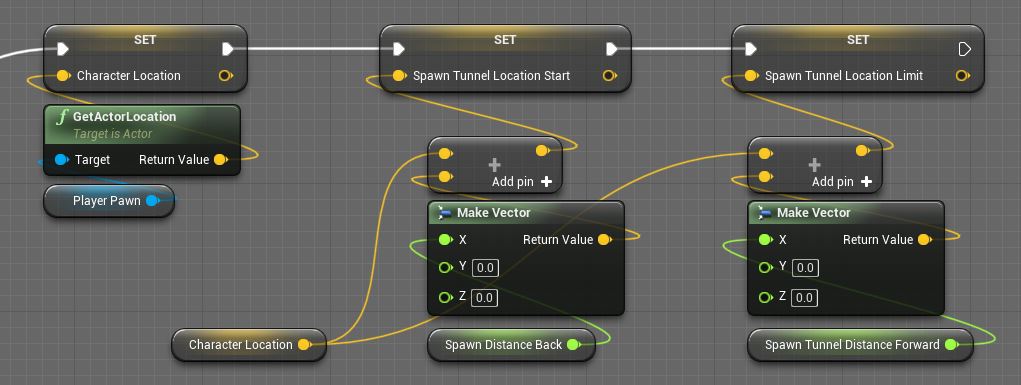
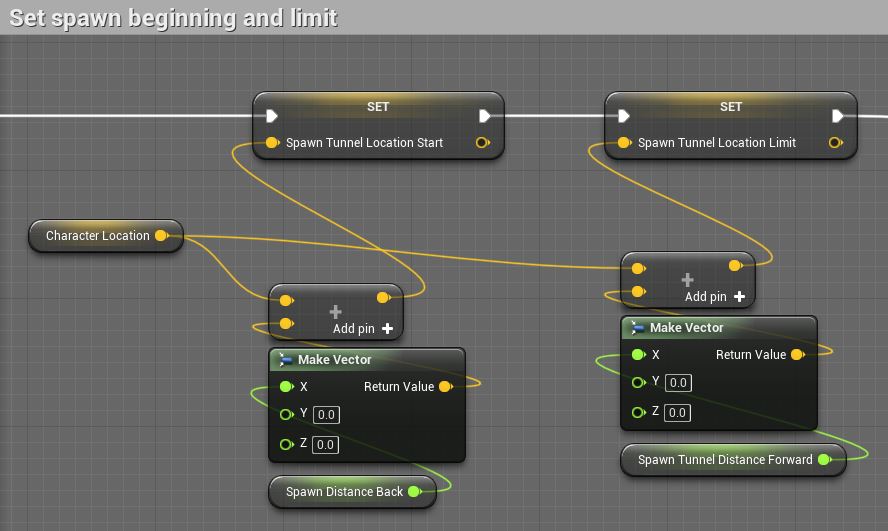
There’s an Actor blueprint which controls all the road spawning/reuse logic called BP_WorldSpawn. This is dropped into the level where the spawning should begin (at the same coordinates as the player pawn begins). On BeginPlay, BP_WorldSpawn gets the player pawn start location, and determines how much space needs to be filled with segments based on how long each segment is: starting a short distance behind the player (SpawnTunnelDistanceBack, about 3 segments in this case) to allow for a following camera, and going forward until a predefined view distance is reached (SpawnTunnelDistanceForward, based on how far the camera can see forward due to fog, about 80 segments in this case for a very long view distance, but this can be scaled down for lower spec PCs while simply moving the fog “cutoff” distance closer by adjusting density).
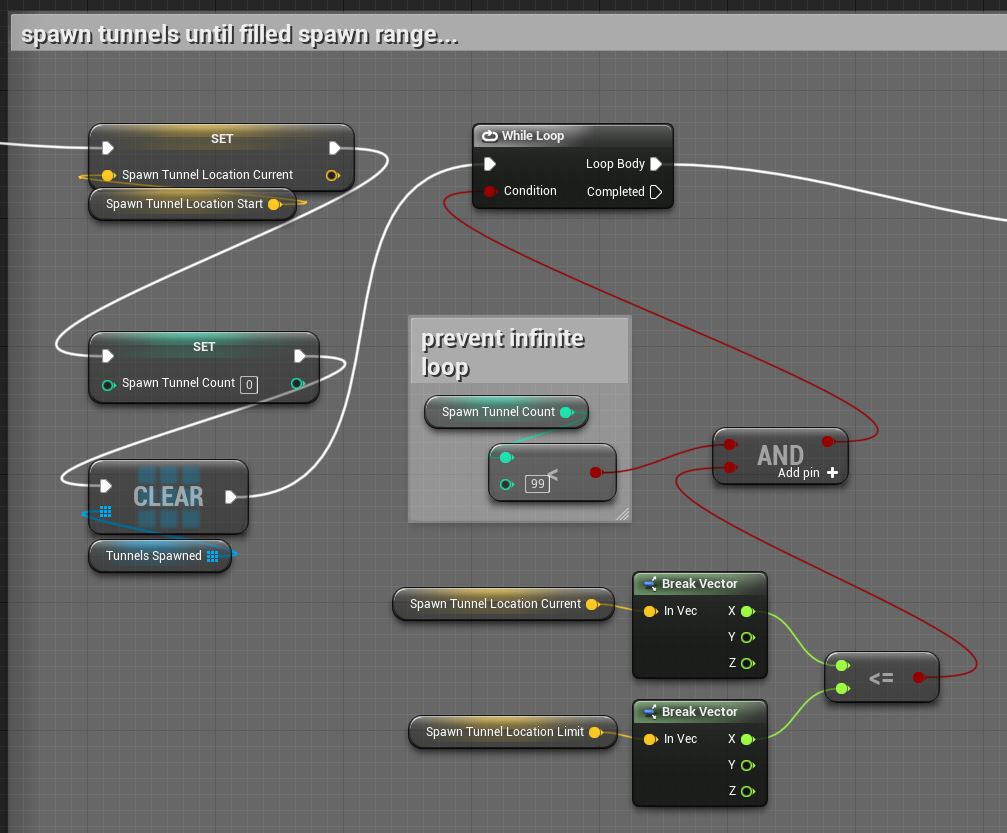
Next (still in BP_WorldSpawn’s BeginPlay event), a while loop tests if we’ve reached the end of the spawn range: if not, spawn a BP_Tunnel as a Child Actor component in the current spawn location, add the new child actor component to an array (TunnelsSpawned), set the new component’s tunnel configuration (does this section have a ceiling? walls? outer supports?), and increment the current spawn location by the length of one segment. Then repeat the while loop until limit is reached.
Now on Tick in BP_WorldSpawn, get current player Pawn location, and see if it has gone far enough to need a new road segment moved out to the front of the line (if Pawn location + SpawnTunnelDistanceForward is greater than the location of the most recently spawned/moved segment + the length of one segment).
If a segment movement is required, update SpawnTunnelLocationStart and SpawnTunnelLocationLimit to the new desired spawn range beginning and end (just like we did in BP_WorldSpawn’s BeginPlay before initially spawning the child actor components).
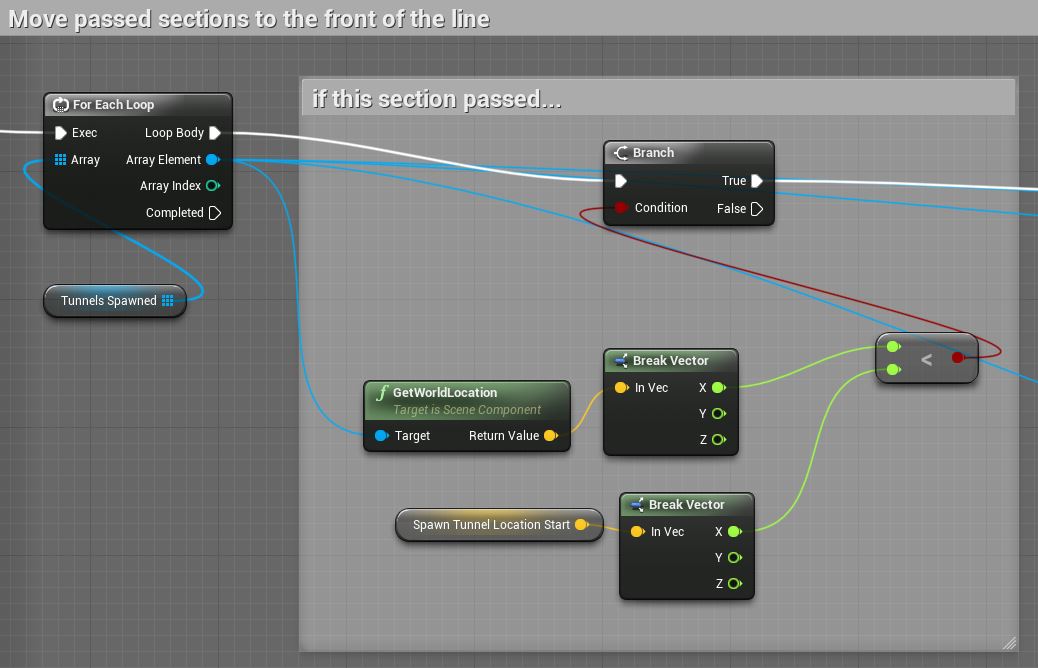
Then loop through tunnel components to see which ones are outside (behind) our spawn range:
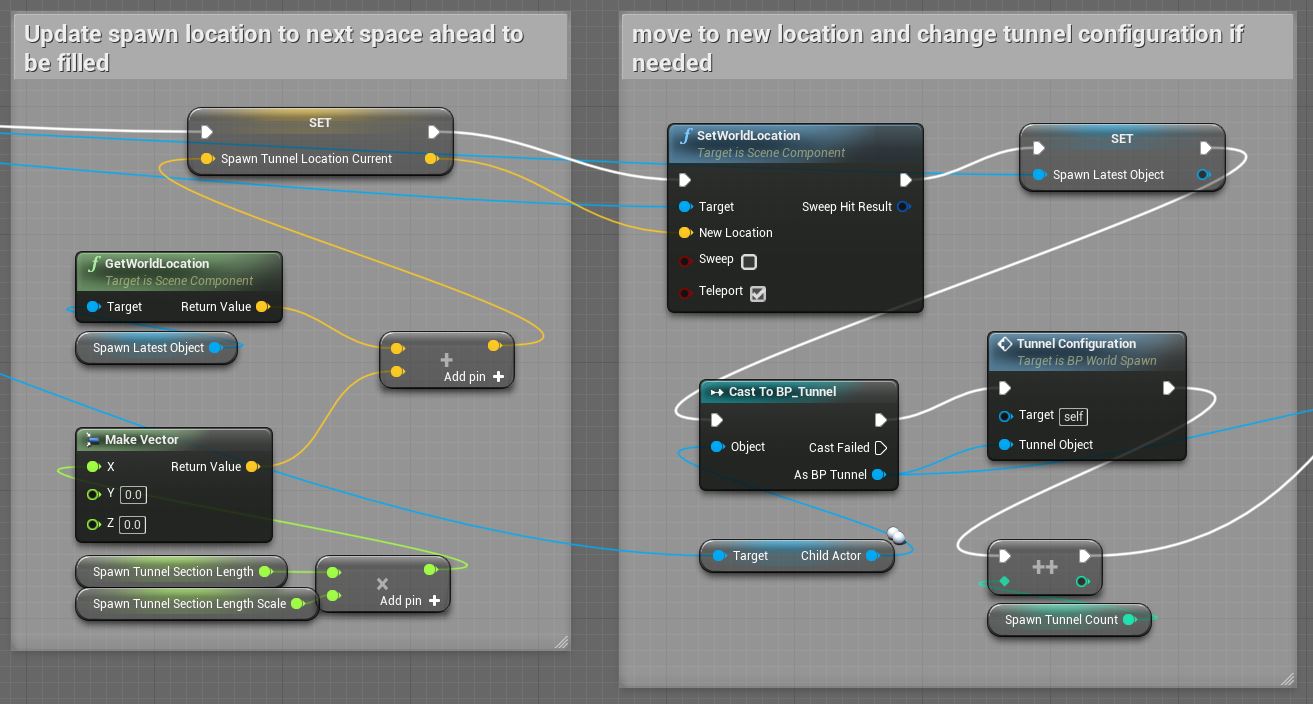
If a tunnel segment is behind the player, set new spawn location (most recent spawn location + segment length), move the child actor component to this new location, and update its configuration if needed (walls, ceiling, etc):
The only caveat involves a World Origin Shift: when this occurs, the tunnel child actor components will need to be looped through and moved by the amount of the shift (as shown in step 6 of the previous post).
Since starting this project I’ve added completely procedural music/audio (including the ability to play music on the in-game synthesizer), and made a lot of changes and improvements to the visuals.
This is absolutely epic - how do you curve the road? Is the difference so little (per piece) that you just rotate them, or is “offset target” some other method?