This script is a godsend. I’m a freelance 3D modeler and Animator and all this technical stuff trying to import models from Blender to UE4 was a nightmare. Before this script I spent months troubleshooting trying to get characters properly imported into UE4 from Blender, causing headaches for me and the dev team I was working with (I actually spent a few months learning Maya just to circumvent issues with root animation).
What this script does is makes the whole process a few clicks and even allows for importing animations with relative ease. This also makes the process of collaborating with other artists brilliantly simple since brings any model to basic UE4 standards.
I really cant recommend this thing more for Blender to UE4 artists, seriously its a huge time saver.
I applied for an Epic Grant for the script but never heard back. To be fair they probably get thousands of applications so this is unlikely. However if Epic did provide a grant I’d dispense with the fee and just move to GitHub. There are a couple more features I’d like to add but the script is pretty useful as it is.
I would suggest this for anyone that hates retargeting or wants a true UE4 rig made in blender.
I recently created a character rig using this and it was pretty difficult to go through the video tutorial. I did take notes though so I’m posting them here for anyone else that buys the product. I’ll update this as needed.
Set up the scene
- unit scale .01
- focal length end 50m
Import UE4 dude to blender.
- Main: Uncheck import animation
- Armatures: Check automatic bone orientation
Import your rigged character
Create a new meta rig and scale it x100
Run uefy
- To run the script open Blender’s “Scripting” layout. Click on the open button and navigate to the script and select it. Afterwards click on “Run Script”.
Your Characters bones
- You can also use this script for renaming GitHub - enziop/mixamo_converter: Blender addon for converting mixamo animations to Unreal 4 rootmotio
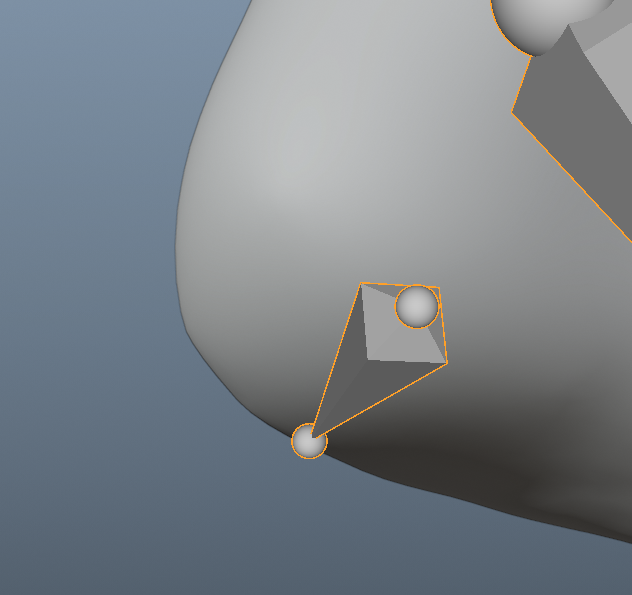
- Use UEFY to roll the bones to face the correct xyz. You can use right click symmetrize to fix the other half and to view the axis of bones go into “object data”
- The right foot need to be like this, then symmetrize

Select the rigs in uefy script panel
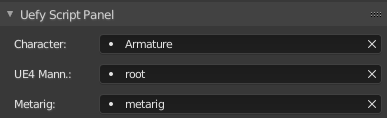
Now pre-process the bones with “Setup bone names” and then “pose character”

modify the rest pose
- Go in “Object Mode” and select your deformed object.
- Go into the objects object modifiers
- Copy the “Armature Modifier”
- Apply the first (original) “Armature Modifier”
- Do this for each mesh on your rig.
- Select your armature and go in “Pose Mode”.
- “Apply Pose as Rest Pose” in the “Pose” menu. This will clear the double deformation and put your object in your new rest pose.
The metarig
Make sure the metarig feet axis are facing like this
the heel needs to be like this
Go into object mode and make sure there’s no rotation or location transforms on the armature or meshes.
Scale the metarig up to match the shoulders
Align the spine to better fit your rig
Apply transforms
Select the character mesh, apply it’s modifier
Then unparent it from the old rig
Move the metarig into the same collection as your character
Generate the rigify rig
Parent the rig. Select the mesh then the (generated)rig, then do this

You can hide the metarig now
Deselect all, then build unreal skeleton
then click weight paint
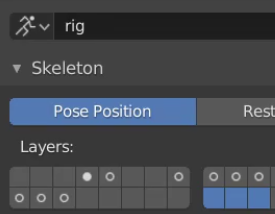
the new bones are on these three layers
Exporting
IMPORTANT Rename the rig Armature
Select the character and rig
Go to file/export/fbx
- Main: Selected objects
- Armature:

Then name it and export
True UE4 Skeleton
Make a backup save
Then set original bone rolls
I would like to understand under which circumstances it would be appropriate to do this. I’ve found that if I don’t do this and if I also don’t select the UE4 Mannequin skeleton (the Epic Skeleton) upon import of my skeletal mesh into UE4, then I can still retarget a free Epic Skeleton-based animation to my (newly generated by UE4 upon import) skeleton just fine. And the resulting retargeted animation looks just fine.
Some 3rd party blueprints and some hardware based projects might expect the same bone rolls on characters as the UE4 Mannequin. I know atleast a couple of cases where this was needed by Uefy Script customers. Any project that is based on shared animations built on the mannequin will need this too.
For example in https://youtu.be/4Dh5k4ATHYU ALS system is built on the mannequin. With set original bone rolls new characters can be dropped into it very easily. While I can not comment on this system specifically but generally trying to update a system of blueprints like that can be very difficult. So compatible characters with correct bone rolls are needed.
If you are just working on your own project it is probably not necessary but would be very desirable if making content for the unreal marketplace. While Epic has not specifically stated so, not having the correct bone orientations will cause problems for some customers for the above reasons.
Just wanted to say thanks! The Uefy script is really handy and saves us time rigging characters in Blender 2.8 for export to the Unreal Engine. The way the script snaps the Rigify Meta-Rig to an existing armature is quite remarkable and you do a good job explaining things in your tutorial videos. Much appreciated!
@Waves, Thank you so much for making this script! I can’t even tell you how much time I wasted trying to come up with a workflow that works for Fuse CC/Mixamo-rigged characters for use with UE4. I had even resorted to learning rigging by hand because I was so frustrated. I was nervous about purchasing the script at first because of how many issues I had had previously in my own attempts but I’m amazed how well this script works!
I do have one question though. Can this script also be used for modifying just a mixamo animation without a skinned mesh? If so, do you have a video tutorial showing a workflow for this? If so, that would be amazing!
Thanks again @Waves!
Hey!
Uefy Script has become a core part of my workflow when building game mechanics with UE4. I use Uefy to quickly and effectively rig character models to the UE skeleton so that I can use animations I already have, saving me alot of time! The video tutorials are well done and thorough! I highly recommend this script for artists as well as generalists!
If you were on the fence about this script, go for it! It’s really worth your money compared to how much time it saves you!
Thanks for your review! Glad the script is working out for you.
Currently the script is geared towards getting custom characters rigged and exported to Unreal Engine with new animations made with Rigify. Modifying existing animations might sound very similar but really it is quite a different task. I do have some ideas on how to get that going but my priority for my own project was to get new characters into the engine and have them talking.
Just wanted to clarify since many people ask this. The script is not tied to any particular external software like Mixamo/FuseCC or MakeHuman. Although it has some utility functions which can make things go faster with some of these software. However you can use a mesh from any source. Including making your own purely custom built character mesh.
The only requirements is that you must add a basic skeleton and weight paint similar to unreal mannequin ie. 6 bone spine, 4 bone limbs and 3 bone fingers.
Adding a simple skeleton is easily done in Blender. Since a bunch of people have asked for this I will make a video that shows how rig a plain mesh with the script to a fully compatible epic skeleton character. No time frame yet, just wanted to say you can use your own characters. Same as some of the people have posted testimonials above.
**EDIT: **Script works great, you rock! Rigging is no easy task for a beginner, but with several hours of googling and repeated trial and error, it’s doable! My problem below was cause by a UE4 animation that positioned the mesh to fingers. I followed the tutorial too closely and deleted all of mine lol. Renamed & repositioned all fingers, works like a charm!
Rakiz - Uefy looks awesome. Can it be used to skin a static mesh to the UE mannequin? Most of videos import an existing skeletal mesh, but I just have several meshes I want to skin to the stock UE4 Mannequin. ( Eg Made in zbrush, planning to only use animations already in UE ).
The current process from videos looks like:
Import Existing OriginalCharacter Skeletal Mesh.
Import Existing Stock UE Mannequin.
Create Rigify metarig_skeleton.
“Setup Character Bone Names” to change the OriginalCharacter Names to match UEMann
Use “Roll Bone” to match OriginalCharacter to UEMann Orientations
“Pose Metarig” to match OriginalCharacter to the UEMann Pose
Manually size metarig_skeleton to match Character
Manually fix metarig_skeleton feet and spine
Remove Character Armature from Mesh (23:00)
Click “Generate Rig” to create GeneratedRig. This creates a GeneratedRig in the position of the metarig_skeleton
Attach Mesh to GeneratedRig with Armature Deform
“BuildUnrealSkeleton” to generate new UnrealSkelton from ??? (not sure where positions come from)
“Weight Paint” to transfer weights from OriginalCharacter
So if I dont have a skeleton and just a static mesh, should I just:
create a new meta rig
position it on mesh
bind it with automatic weights.
“BuildUnrealSkeleton” to generate new UnrealSkelton from ??? (not sure where positions come from)
“Weight Paint” to transfer weights from OriginalCharacter
Thanks for any advice/help
Yes you can use the script with a static mesh with no skeleton. I’ve been meaning to make a demonstration of this but i suck at weight painting and doing this requires getting some weight paint in there. Perhaps I can demo this with a simpler mesh just to show how to do it and leave the more advanced characters to the experts.
The process would be to add a custom armature and match the basic Epic Skeleton:
- Six bone spine
- Four bone limbs (thigh, lowerleg, foot, toe) and (shoulder, upperarm, lowerarm, hand)
- Three bone fingers.
Then you need to rename the bones to have the same names as they do in the epic skeleton. If you make only the left side you can use Symmetrize to autobuild and autorename the other half of the skeleton.
Then comes the part I find difficult. You need to weight paint these bones. You can ignore any twist bone or IK or any of that stuff as the script will build those for you. You can update weights for those bones later.
After that just follow the rig any character video as above and it is just the same process.
I found that this addon works very well for skinning meshes in Blender. Voxel Heat Diffuse Skinning - Blender Market
You don’t really need an addon for weight painting. Blender’s default auto skinning works very well. There are 3 points on the character that require manual updates. I’ll show this in the tutorial I am making.
I found that Blender’s default auto skinning doesn’t work well when the character isn’t a single, contiguous mesh which is what I require. I am developing a character that is split into head, hair, eyes, torso, legs, hands and feet meshes, each of which can be exchanged for a different mesh at runtime.
Hey Waves, we had talked a few months back through email, and I want to say, I am absolutely LOVING this product. I encourage anyone and everyone to give this man some financial support for such an amazing product! I was not aware of how powerful this is, and how relatively easy it is. Once you have it set up, the rest is a breeze. Thank you again Waves!
Uefy Script v1.3 Released!
This release adds two new tools to assist in rigging static meshes. i.e characters that have no skeleton or bones at all. Added a bone renaming tool which will save you a lot of typing and a weight paint mirror tool that automates an otherwise tedious process.
This is a free update for existing customers. If you have purchased the script just use the same download link from the original email to get the updated file.
[FONT=comic sans ms]“Can I rig a character I made with no skeleton using the script?”
I get asked this every other week. 
Yes you can. Just to prove it there is also a brand new tutorial on exactly how to do that.

Rigging a Static Mesh
Full Video on Youtube: How to rig a character from Blender to UE4 with Uefy Script v1.3 - YouTube<
In my last video
How to rig a character from Blender to UE4 with Uefy Script v1.3 - YouTube](How to rig a character from Blender to UE4 with Ue)
around 32:05 mark I reset the rotations on the lower finger bones. Unfortunately the finger bones on the unreal mannequin are wavy and not straight. So I do this in all of my tutorials. If you plan to make a lot of your own animations then this is definitely the thing to do.
However if you want to mostly use marketplace animations from epic games built on the unreal mannequin. Then it might be better to leave the finger bones as is and fix the mesh instead. Meaning the bones will remain wavy like they are in the mannequin. But you will go into edit mode on the mesh and straighten out the finger mesh instead.
I expect most people will use the script with prebuilt animations and only create new animations to fill in any blanks or custom needs. It is unfortunate that the fingers are wavy in the original mannequin. We just have to work around this issue based on the needs of the project.
I’m having some trouble with the root bone’s scale. It’s getting set to 100 and causing issues with stock animations when I replace the skeleton with the one from the UE4 mannequin. I’m guessing I need to scale the mesh and armature by 100x and apply before exporting with all the scaling set to 1. Is this correct?