Good morning, Unrealists,
Now I don’t know if this is a question, or an informative post, or whatever it is, but it’s long and I apologize for that.
The reason I made this thread was because I looked around for this for a while and found nothing, so decided to write something.
I also really like to talk.
Anyway, I’ve recently been thinking about a specific detail that’s been frequently overlooked (at least in my experience),
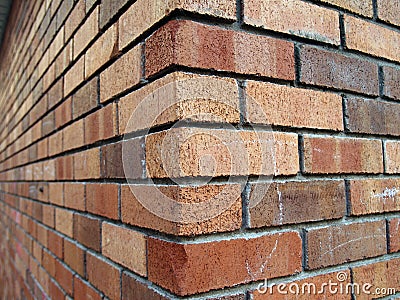
I’m of course talking about dealing with wall edges textured with bricks/tiles or anything height-related that shouldn’t be cut so intensely.
Here’s a quick example to visualize the problem:

So the course of action I immediately came up with was to remove the bricks at the corners, then replace them with smaller bricks to fit the area (which is a whole different story I won’t be lengthening the thread for), rather than be hard-cut, which gets exceedingly unattractive when dealing with heightmaps and tessellation.
I found three practical ways for doing so, none perfect, so I will list them and their disadvantages.
- Creating separate models.
- Using material masks.
- Using vertex painting.
The result of course is almost identical,
However they all have disadvantages that almost make them unusable.
So, let’s get into detail:
- Creating separate models:
A very primitive solution, I believe, but it made the most sense.
So the idea is to create two materials (let’s assume we’re using substance), so we make a brick wall texture with bricks and mortar, then we mask out the bricks which leaves us a solid mortar texture.
We pop our brick texture into 3ds max (or whatever), uv them walls, then cut out the extra brick-pieces from the model, and make them into a new model which will be assigned the mortar material.
This is how it looks in Max:
Disadvantages:
- The models are based on the texture, so any change to the texture or the model, will really mess everything up, and you basically have to start from scratch.
- Any problems you stumble upon are not easily fixed, especially that you can’t do anything in-engine, so most of the time you’d have to start over.
Currently I’m leaning towards this method as it has the least destructive disadvantages provided no mistakes/changes are made.
- Using material masks:
Now this method is a little bit less troublesome, as it’s very easily adjustable if anything goes wrong, you basically fix the mask in photoshop and reimport. no need to remodel anything or import blindly hoping the problem just disappeared.
All it is, is using the two textures explained above, and masking them to remove the bricks in the corners.
Disadvantages:
- The mask is just a bitmap used in accordance to the model’s UVs, so if you have a 4-room house you’re working on, you’re gonna have a lot of textures and material instances to create the masks for each wall and edge.
- It can be tricky to get the mask to fit the model, especially if the uv you set isn’t straightforward, so you might have tiling textures, and a stretched mask covering the entire model (you definitely don’t want the mask to tile).
- Using vertex painting:
a.k.a 2-way blends](Create a Material for 2-Way Texture Blending | Unreal Engine Documentation).
This is the most comfortable method, because it’s all handled in-engine, very adjustable, and is just easy to use.
However,
Disadvantage:
- Vertex painting uses vertices to blend textures (hence the name), so if you want a good results, with bricks that are pretty close together, you’re gonna need a LOT of vertices, and I mean a LOT.
This is what my example looks like in wireframe, mind you this is the minimum I could use to blend without transparency on the neighbouring bricks:

Now of course, I could spread the vertices on the edges, so that only the areas I’m using for painting are dense, I decided for the sake of the example to keep it as it is to prepare for the worst-case scenario.
I also want to quickly point out that I do realize there are things like Substance Painter and Quixel (or even manual uv texturing), however I excluded them from this thread because for walls they’re extremely inefficient because the walls can be very big, and a maximum of 4k (8k now ?) textures is not gonna cut it.
Unless you want to split the walls into several models, which brings us right back to the first method I mentioned.
Did I miss something ? am I wrong about one of the methods ? did you find this informative ?
Please express yourself in a reply.
I really want to hear what you guys think.
Thank you for reading, and for being awesome.
Ali.