Hi all, haven’t been on here for a while. Is anyone using C4D with Unreal? Seeing some amazing interiors on here. I’m using vrayforc4d and still struggling to export my scenes from C4D to Unreal.
Any C4D users with tips? 
Regards
Hi all, haven’t been on here for a while. Is anyone using C4D with Unreal? Seeing some amazing interiors on here. I’m using vrayforc4d and still struggling to export my scenes from C4D to Unreal.
Any C4D users with tips?
Regards
If you can export in .fbx you should not have any problem. What’s happening?
Hi George. Can you be more specific about the problem? You should find everything you need in this forum thread Cinema 4D Workflow - Content Creation - Unreal Engine Forums
I found it very helpfull in the past.
Another C4D user here, as other have said please expand on your problems.
Hi guys, sorry for my late reply, been busy busy ![]() was just looking to see if any C4D users had a workflow that they could share with regards to texturing and then exporting from C4D to UE4. A general walk through more than anything. It all seems to be 3D max, blender etc and very little C4D.
was just looking to see if any C4D users had a workflow that they could share with regards to texturing and then exporting from C4D to UE4. A general walk through more than anything. It all seems to be 3D max, blender etc and very little C4D.
Basically preparing textures in C4D for UE4.
Regards,
[/QUOTE]
You’ll have to texture in UE4 from what I know.
Regardless what program you’re using for modelling, the basics of modelling for games apply to all of them.
You can adopt a lot of e.g. 3dsMax Tutorials even if you use Cinema 4D.
But you need to know your tools.
Example: when a Max Tutorial talks about smoothing groups, you need to know that you can achive similar results in C4D by using the Phong Tag and Phong breaks.
As for texturing, you won’t be able to bring all these fancy vray shaders into UE4.
They are built for raytraced rendering with high accuracy, while most realtime solutions are just faking certain effects because computing time matters.
I have no experience with vray, so i don’t know if it is possible at all to bake these materials into usable texturemaps.
But in know a lot about baking regular c4d shaders and effects into texturemaps.
Long story short: in a lot of cases what works for rendering doesn’t always work for realtime graphics.
The base of every good realtime model is the UV map.
Rendered models do not always require to be UV mapped because you can work with hundreds of material selections, different material projections and effects like dirt applied as shader effects.
Luckly, if your model has a usable UV map, most of these effects can be baked to texturemaps.
So you can have a Model set up with lots of different materials and bake all these to a single UV map.
Going into detail here would require to write a full scale tutorial, which i don’t wanna do right now.
Thanks Guys, As busy as I am, stills are no longer enough for clients. I have Lumion 6 but when it comes to realism, especially interiors which is my main thing then as I’m sure you all know, Lumion doesn’t cut it at the moment. So, UE 4 here we come…I hope
So this is about architectural visualisation using UE4.
In that case you won’t need to be as strict about multiple materials on models as you would need to be with modelling for a game.
As you might have seen in the ArchVis samples UE4 provides, they can also be quite high in polycount, if it’s restricted to interior scenes.
Also multiple materials on a model isn’t exactly a huge factor here, too.
You might want to split your materials based on the different shaders you’d like to use for them.
So a chair with metal-leather material in C4D should have a polygon selection for the metal parts and one for the leather.
Assign them a material using these selections.
When exporting to UE4, you should use the fbx 6.10 2010 version (on R17.048 at least), since recently someone discovered
that it has the best compatibility with UE4 and exports even materials and textures correctly, if you choose the right export and import options.
One thing you should read for sure is the lightmapping guide Unreal provides:
https://docs.unrealengine.com/latest/INT/Engine/Content/Types/StaticMeshes/LightmapUnwrapping/index.html
For creating a lightmap in C4D, you have to create a second UV Tag on your model e.g. by copying your first one.
Having both Tags use different names is mandatory, the name itself can be whatever you like.
UV0 and UV1 will work as well as DiffuseUV and LightmapUV or SantaClause and EasterBunny.
One disadvantage of C4D is the inability to have a grid snapping on the UV Editor.
Since in UE4 the lightmap will be usually based on a smaller texture resolution, all your UV islands on the lightmap will need enough edge padding and ideally would match the pixels on the UV map properly.
Sometimes a higher Lightmap resolution will work, if you experience issues like light/shadow bleeding, but in other cases you might need to edit your lightmap UVs and split up or attatch uv islands.
In UE4 you might want to build up a material library with base materials, just like you might have in C4D with your vray Materials.
Hi Kraid, Helpful as always, thank you very much for taking the time to advice me on this.
Is there anyway to export with .fbx 2014 with cinema 4d r14? My model exports, but my textures do not and I find it really annoying. I’m probably going to get r17 because I really want to work with ue4 in the future.
George3d and Pandasian , kraid is right guys.
Exporting to UE4 from Cinema 4d with c4d fbx 6.1 2010 and it works like a Pro ,it export the textures and even the textures are compiling it right, every is be setup Color channel, Luminance channel, reflectance or Spec… channel and Normal channel for the material, works fine, also no need for creating Light-Maps because if you add it, It will not work, just let UE4 generate light-map for you in importing process, which is great and everything works fine. But now when I try to use 7.4 2014 or 7.5 2016 , it dont work right.
Also you can only use R16 and R17 fbx 6.1 2010 for method to work.
Go to this Forum: Cinema 4D Workflow - Content Creation - Unreal Engine Forums
or this one:
Exporting to UE4 from Cinema 4d with FBX 2010 vs FBX 2016 but 2010 works like a Pro - General Discussion - Unreal Engine Forums
Cheers,
AP \ CGI ART
@Pandasian: alternatively you could use thirdparty fbx exporters like Cactus Dans fbx exporter, unless you want to buy R17 for other reasons too.
@CGI Art: lightmap UV export works just fine in R17.048 with fbx 6.1 2010 exporter.
Any other version of cinema or fbx exporter destroys the smoothing information when having two UV Tags.
The automatic lightmap creation can work for some meshes, others might end up with a worse UV layout.
For sure it takes away the control over the lightmap UV layout, just like any automatism used.
Hello there, thanks for the super detailed post.
I’m super noob with ue4 and what follows could be wrong and useless.
Regarding the inability of C4D to grid snap onto the UV Editor, how about we use a plane as reference grid and we snap the islands\shells to the edges of it?
The workflow would be something like this:
As I’ve mentioned I’m pretty fresh to UE4 workflows and that could be a useless wall of text.
You tell me what you think.
I’ve a couple questions too:
How important it really is this perfect snapping to the pixel of the lightmap? Does it contribute a lot to the shadow leaking issue? Would be nice to see some real world test with different combinations (ie. not_snapped+high_res lightmap VS perfectly_snapped+low_res lightmap)
What is the workflow then for snapping organic meshes with lot of non straight faces?
If I understood correctly, for lightmaps baking inside UE4 it’s irrelevant if UVs are crazily unwrapped, as long as they don’t overlap, right? So you could snap to the grid the outer edges/points of an island, in order to make it perfectly squared, without caring if that would skew the UVs in an unnatural way when compared to the mesh, right?
Just a quick note:
you can turn the polygon selection of the grid invisible, which also applies to the UV polygons in UV edit.
It’ll still snap the vertics to the grid.
One thing you need to pay attention to is the way you remove the UV Grid model.
In worst case it’ll destroy your whole UV layout by reassigning UVs.
The whole Layout will look the same, but the UV polygons were assigned to other polygons.
Had that issue when i was testing this approach a while ago, which made me ditch that idea completly.
Obviously i did something wrong then, because in my new test a few minutes ago it worked as intended.
So is it a viable solution? Glad to hear that.
And thank for the tip for making the grid invisible!
Regarding the issue you had in the past, might be it caused by a wrong stack order of your meshes in the objects manager? When you’re going to “connect the objects”, the points of the bottom mesh (in the obj manager) are going to be added up to the ones of the upper mesh in the object manager (you can easily check it by having a look at the structure tab that shows points information).
So I guess it’s important to have our Plane\reference_grid underneath our main model in the obj manager, so that when we erase the plane, no shift in the point structure is going to occur, because we erased only the very last points of the structure.
I didn’t experiment this latter part because I’m lazy, but it does make sense to me.
Hello, for transfer from EU4 to C4d I go through blender .
My workflow :
I export to FBX in C4D ( with my two UV channels) in FBX 2014
I open in blender and I just self rule smooth 60
I export to FBX and I open in EU4
Résulat smooth and 2 uv map
I try every alternative that does not really work
Regards,
The fbx exporter in blender might be more compatible with UE4 or at least doesn’t trigger the smoothing group issue message.
But with the right export settings you can go directly from C4D to UE4 and preserve all UVs material selections and smoothing.
The smoothing group issues message will still appear, but if you selected “import normals and tangents” in the import dialog,
the smoothing will still be correct.
BTW: self rule smooth 60° might work for many models, but sometimes you want hard edges on certain parts that are less then 60°
and other parts of the same model shall stay smoothed even if they are above 60°.
So it’s always better to do the smoothing manually with using the phong angle/self rule smooth only as a start.
My workflow in C4D is to determin a phong angle that is suitable for most parts, usually the default 80° works best.
Then i go in and fix smoothing for the parts where it doesn’t work out, using tools like loop selection and phongbreak selection in edge mode.
On the second tool I often use the ignore phong tag option and set the value manually till the blue lines match what i intended to select.
Once everything is selected, i use the break phongshading command.
Now i prepear for exporting. This means triangulating the mesh, eventually using the turn edges command on a few edges and then
applying a normal Tag using the Vertex Normal tool.
If you have the commercial version of VNT, you can also do a lot of crazy Vertex Normal manipulating stuff,
that is at least a lot harder to achive with the free lite version.
Especially the “steal normals” command makes it much easier to straighten out the shading on cylinder shapes.
Examples of Vertex editing:
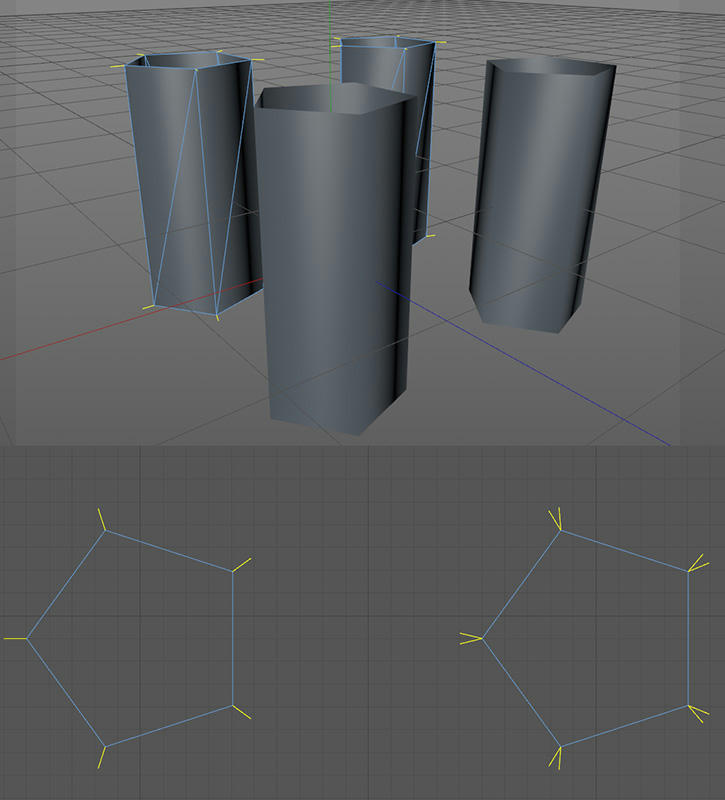
on the right: the mesh after triangulation, on the left: mesh with fixed vertex normals, stolen from an untriangulated version of this mesh.
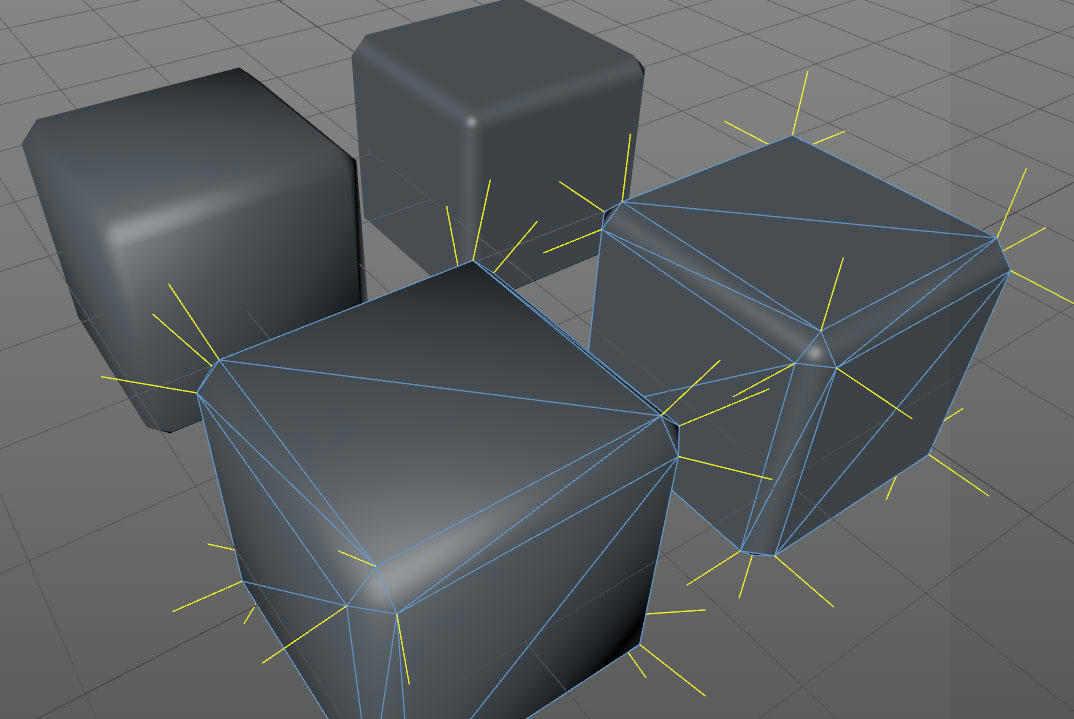
you can also do rounded corners with that tool
The vertex count of this cube is the same as the vertex count of a cube without bevel but with phong breaks.
Because the shading breaks are achived by splitting the vertex points.
So a mesh that has exactly the same vertex count but doesn’t require a normalmap for rounded edges, sounds very good to me.
BTW: i’d really recomend VNT and Pixelberg to every 3d Game Artist working with C4D.
Pixelberg is like having Marmorset inside C4D.
I’ve always said that the CGI community is the most helpful/generous…thanks for the info you guys have been posting on my post.
Hello , Kraid
I tried following your instruction , but I can not have a good result. Could do a video showing your tutoril worklow with a simple rounded Cude
Best regards,