On your first screenshot you need to check Details->Landscape->ZFigtingFix and then press ApplySplineToLandscape button.
Also use Details->Landscape->AutoDeformWidth to roughly calculate required DeformWidth parameter.
Also set ASTLOffset(ApplySplineToLandscape Offset) to 23 if you wish the landscape to be raised almost flush with sidewalks. Then carve the road(ApplySplineToLandscape button) with ASTLOffset set to -10(to avoid z-fighting) and appropriate DeformWidth value.
I guess it is confusing at first and this process can definitely be improved in the future.
@ZyosCR Both, Landscape and Road Blueprint must reside in the current level. Then you can select landscape from drop down menu or pick it in the viewport. I cannot reproduce your issue. It works fine for me. Does it work for you when not using composition? Have you tried to do this when only one road is selected?
@GlimpseOfDawn IK that it needs to be in the current level and it is in Current Level, I created a new project with the same map but without World Composition and I can Choose the landscape and fallow the tutorial, but now I founded another glitch, when I try to Apply Spline to Landscape its make a part of the map black.
And yes I Also tried doing it with ony one road selected.
Still not working in World Composition, I’m using ue4 4.21
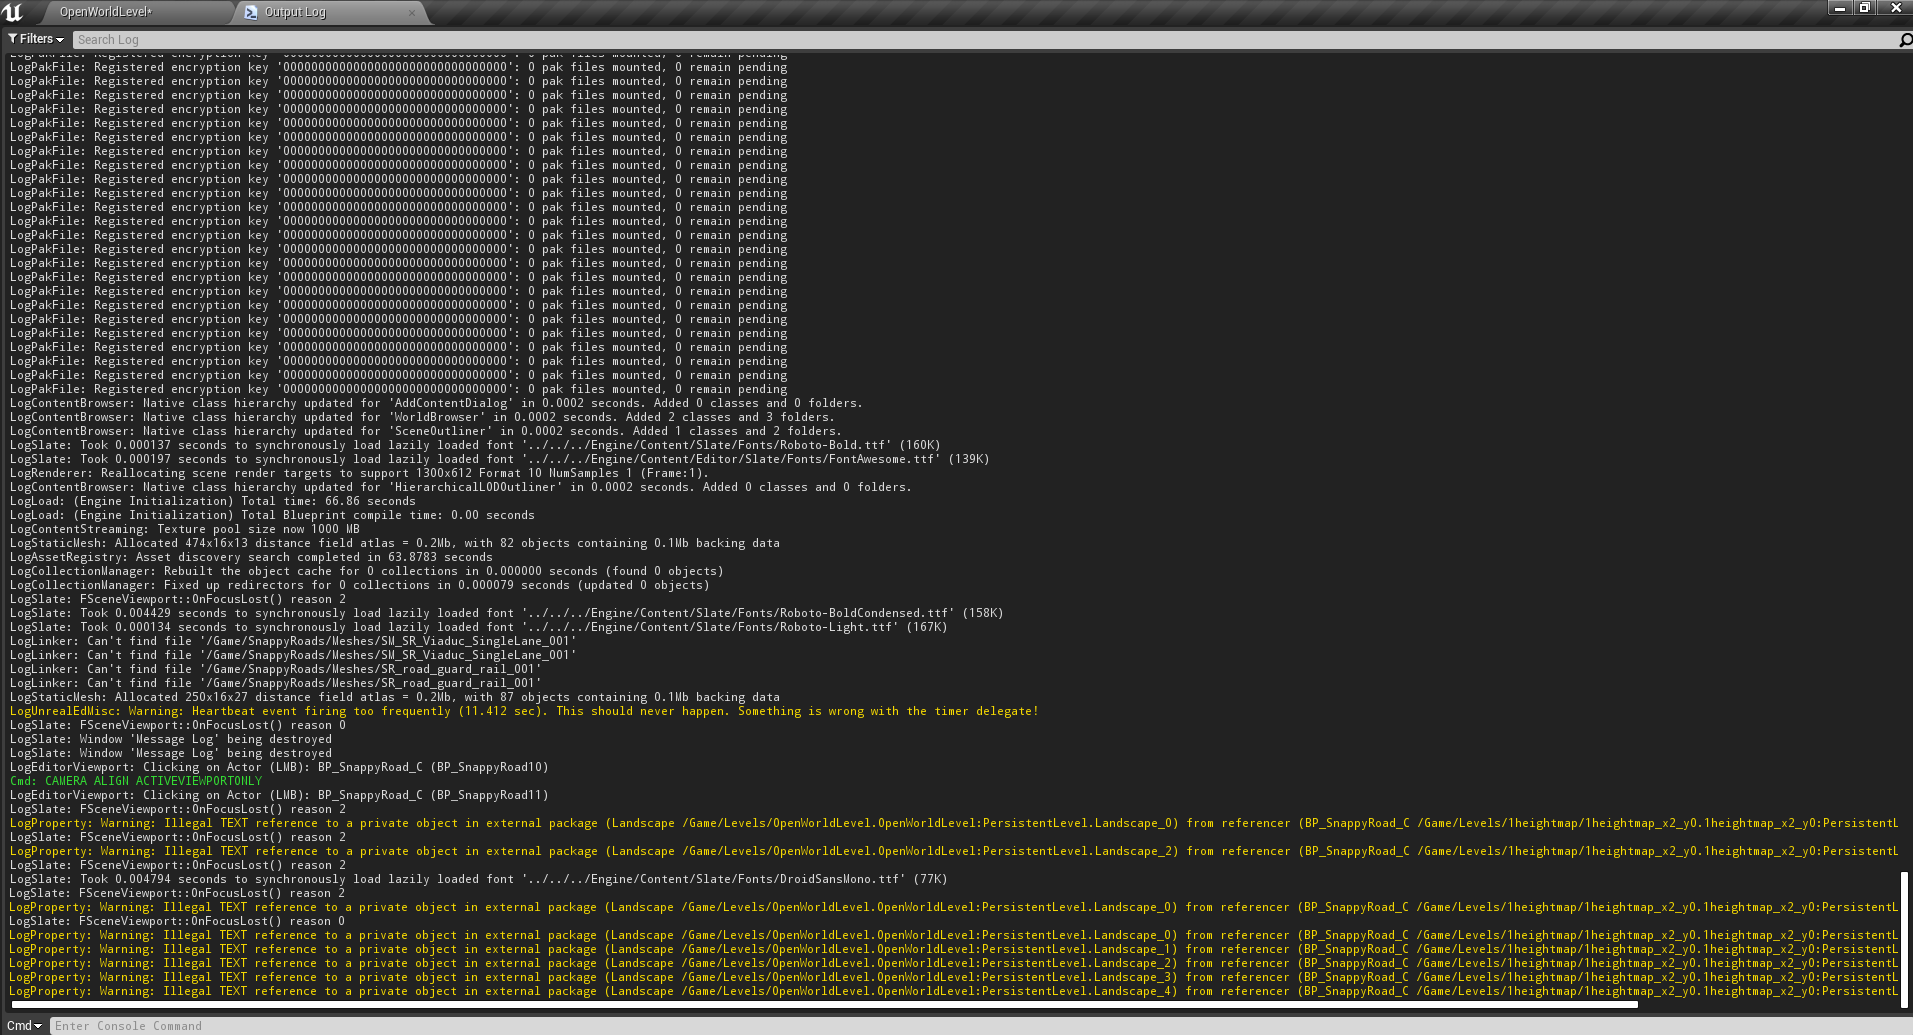
@ZyosCR I’m able to assign landscape with world composition enabled in 4.22. Can you open Output Log window and then try to assign landscape again and see what errors prevent it from working properly for you?
About second issue: Make sure landscape Paint Layers have correct Layer Info assigned to them. And if you are using your custom layers you’re going to need your Layer Infos assigned inside SetLandscapeLayerInfo macro.
@ZyosCR Sorry I couldn’t get back to you sooner. The errors you get show that your Landscape objects and Road Blueprints are located in different levels. They need to be in the same level in order to be able to reference each other. All of your landscapes are located inside OpenWorldLevel and all selected roads are inside 1heightmap_x2_y0 level. To fix this, you can move your landscapes to the 1heightmap_x2_y0 level for example.
@Shepard_Fox
Hi, do you mean BP_SnappyRoad->Details->Spline->MaxDrawDistance? You’ll need to enable Game View (press G) for it to take effect inside viewport.
Hi,in 4.18 works fine to me,i tryed in a blank project i tryed in your map,its all the same in my project in 4.21,i change some things in blueprint but i have no effect,my distance cannot go higher than 50000.0,i put 99999999 just for test and nothing changed,the only thing can i get is put a lower number,worked,but its even worse for me.
50000.0 is a good number but not in my project,the roads are larger and my roads are rendering almost in front of me,if you discovery something let me know,thanks
Is there any plans into the future to make the Curbs longer ? the one that is endless long is only ONE sided, but the one I need (the round one) can only be streched 10 meters then it start over again.
@Shepard_Fox Thanks for reporting it. There appear to be some issues with draw distance in ue4.20-4.21. You can fix it if you go to the road blueprint, then open AddRoadSegments function and find AddSplineMeshComonent node not far from entry point. Select it and go to Details->Rendering->ShowAdvanced->LOD->DesiredMaxDrawDistance. Set it to “1” and then back to “0”. Re-compile the blueprint.
@arybashov Sorry, there’s no documentation available yet. Only “Getting Started” tutorial. To modify sections you can use “Section Replace” or one of the distribution modes:
Single - supports section replace and other features. It uses first item in the SplineMeshes Array.
Random - as its name suggests places sections randomly from SplineMeshes Array.
Sequential - places sections in the same order they are found in SplineMeshes Array, then repeats.
FirstAndLast - uses first item for the road and second item for the caps. If third item is specified then it is used as a second cap.
Thank you GlimpseOfDawn worked like a charm,to me the tool is complete,is very incredible,and the new performance box is very good,thanks for your hard work.
I will provide as soon I am at my computer.
But the curbs (the concrete/grass in the middle of some roads or parking space) you got 1 in the pack that is oval shape.
When I stretch it 4 meters it’s oval, but if I stretch it 10 meters it split up in 2 ovals, and if I stretch it to 15 meters it split to 3 ovals… I want 1 long.
I think if you design one that don’t have the round ending, it could last forever like the sidewalk.
I can also use a sidewalk as a center in the road, but the sidewalk only have 1 side closed and the other open.
I uploaded a picture that show exactly my problem.
The middle section is what I need but I want it to be much longer.
I don’t want it to be 2, like in the picture also
@liteglow I understand you now. You need to create a tileable road separator mesh without round ends. And you also need a round cap mesh. Then you will be able to make this long separator with caps using additional road blueprint. You can make them yourself out of existing ones or use pre-made roads under Meshes/4Lane_Separated/ folder. I plan to improve the blueprint to make working with caps easier in the future.