Modern Kitchen

My build quality was set to High but even production gives me similar results.
I have been optimizing my lightmaps, think they are quite ok now (see screenshot) but can’t get any good results.

Even tried the Ray Traced Distance Field Soft Shadows technique as suggested by someone at answerhub but can’t seem to find the settings for this?

Looking at your screenshots, it looks like you didn’t set up any bouncelights and bouncecards as Koolas does in his scenes.
Take a look at his lightroom demo scene in the Marketplace. This technique should help letting more light get into your rooms to bounce around.
I haven’t played too much myself with UE4 yet myself, but this probably should help getting cleaner results…

PS: I made a short breakdown of Koola’s scene in a blogpost, you can also find a screenshot of the bouncecard-setup in there:

Well that makes sense, I knew about the bouncelights but for some reason it didn’t come to mind this could help solving the artifacts problem. Thx!

AVL_viz

You use an object with a large area. Divide the whole house at a room or walls and set 1024 or 512 for each.

Ray Traced Distance Field Soft Shadows can only be used for dynamic light sky. If you do the interior, then put a static light and is used in windows domolnitelnye plane with light like a Koola, and Experiment with them, they can imitate HDRI lighting, if you will understand how to do it. Then utebya tudet very beautiful light.
Just do not forget about the post processing and color correction.

Thx for all the advice, don’t have too much time at the moment to test everything but surely will
@ Taxi : strange vocabulary :))

Google translation)

lightmap at each wall 512 give best quality without artifacts.

and

BaseLightmass.ini :

[DevOptions.StaticLightingProductionQuality]
NumShadowRaysScale=32
NumPenumbraShadowRaysScale=64
ApproximateHighResTexelsPerMaxTransitionDistanceScale=9
MinDistanceFieldUpsampleFactor=7
NumHemisphereSamplesScale=64
NumImportanceSearchPhotonsScale=6
NumDirectPhotonsScale=32
DirectPhotonSearchDistanceScale=.5
NumIndirectPhotonPathsScale=32
NumIndirectPhotonsScale=64
NumIndirectIrradiancePhotonsScale=32
RecordRadiusScaleScale=.45
InterpolationMaxAngleScale=.75
IrradianceCacheSmoothFactor=.75
NumAdaptiveRefinementLevels=3
AdaptiveBrightnessThresholdScale=.25
AdaptiveFirstBouncePhotonConeAngleScale=2.5

I already have been playing with some settings, changed my BaseLightmass.ini, set IndirectLightingQuality to 2 and IndirectLightingSmoothness around .7 and results are pretty good now.

8669f7aeabeaaa44663fde83106f966d0454a5f4.jpeg

But next problem already showing up :slight_smile: walls seems to cast a lot of white color onto my floor.
While material is very basic

d8cc5586ffd6bea4c3a72f45b1d86e3f1abe74d9.jpeg


870afb97d4a5a7ad4ef49f1ee413d6cab41803e1.jpeg

If you put these settings as described below, the color will become more natural.
Do you have many windows open so will the blue light from the sky. Do a little orange sun. it balances the color blue.
Warm and cold - the yin and yang. it is necessary to supplement the opposite, then there will be a sense of completeness and wholeness,comfort, beauty.

This principle can be used more in the secondary coverage if you use a plane with light as Koola, instead of white there should put a picture of the landscape, the cold streak the sky and warm strip of land illuminate the room more natural shadows from objects give shape and color.
http://s1.1zoom.me/big3/93/340436-svetik.jpg?m=1

see at color of shadows:

&d=1415136544

At the last stage did tone correction, color correction, and white balance.
you can still do a bit of gray paint.

My max settings(final render):

Satic Lighting level Scale: 0.2 (set 1 if dond have much time)
Num Inderect Light Bunces: 100 (in real life, millions of photons reflected from objects just before you get into the eye, so this option is placed on the maximum)
Inderect Lighting Quality: 7
Inderect Lighting Quality: 0.3 (set 0.85 or 1 if dond have much time)
Enviroment color: Black
Use Ambient Occlusion: ] disabe (only in global postprocess tune AO, because in real life angles are not forced to dark, AO simulation of global illumination and we receive it as a result building lightmass)

sun 2 on 4 intensity
use “Sky light” tool, intensity 0.25
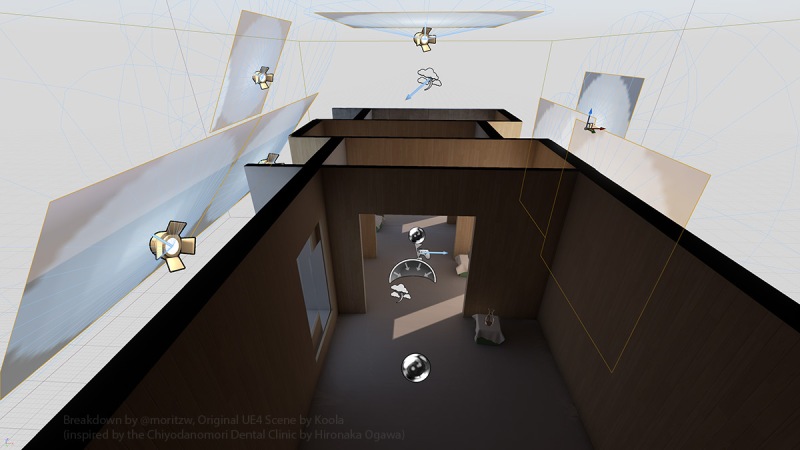
on projectors that give a light from the sky through the window in the reflection from the planes set:
Mobility Static
Intensity 20
Use Inverse Squared Falloff ] disabe
Light Falloff Exponent 0.0001

material:
in Specular always use Fresnel

Fresnel -------> mask of lerp (a,b) a,b set Scalar parameter for each material and mask from diffuse for second lerp, it will be their.
See on water, plastic, tile, papir, paint, all the light is reflected by the Fresnel, values need to pick up watching real materials
And used as a reflection in each room to be Reflect capture, else in the room near the walls will reflect the sky.
In diffuse use more resolution textures of procedural combination.

In Roughness use textures from diffuse
deep space may be more rough than convex or vice versa

All these little things form a sense of photorealism.

Thanx very much, don’t have much time right now but surely gonna give these tips a try!