How would I be able to rotate a vector as if it was attached to another vector? Basically I have a vehicle and I have a relative vector between the center of the vehicle and some mesh that should always stay at the exact same relative location from the center of the mesh (as if it was attached to the vehicle). How would I be able to apply the rotation of the vehicle onto the vector between center of the vehicle and the “attached” mesh. This WITHOUT using attach. The reason I can’t use attach is because attaching causes replication issues.
How would I do this?
This is the closest I’ve goten: Screen capture - b419e9e65a1129541c0e395c03dd5a46 - Gyazo
When I rotate the red platform over roll, pitch and yaw seperately it works perfect. But when the platform rotates over all axis then the result is off.
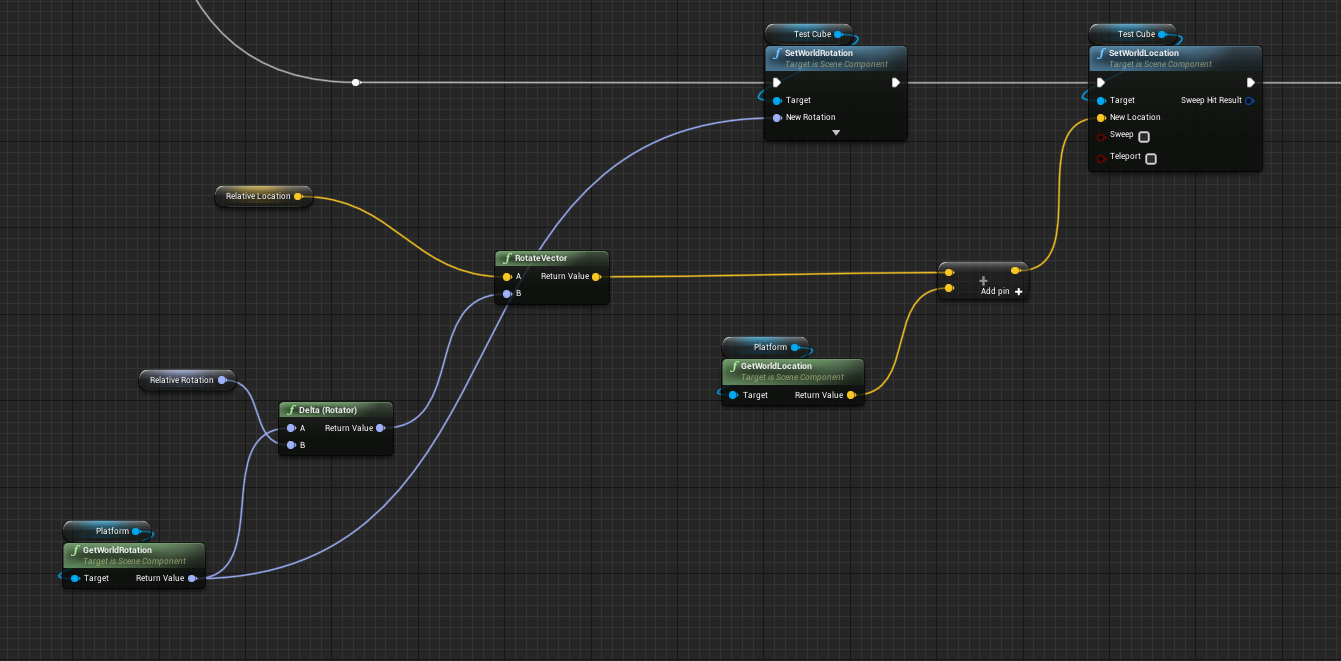
This is the code used to get that result.
What I do here is find the rotation difference between frames from the red platform and apply that to the relative vector between the white cube and the platforms location. Then I add the result to the platform’s location. But as you can see in the video above this gives an incorrect result.
You need vector math, but unreal kind of it. There are probably multiple solutions to your problem, but without having your project its impossible to create ready use blueprint cod. For eg. it matters how your car is oriented ie. is forward on X or Y direction. etc. Also watch component stack, if you rotate something there by 90 deg, all math of that and upper objects need to be rotated by 90 deg. So instead of giving code i give you list of bp nodes.
Now rough ideas.
First is kind of hax, but may be easiest.
Create invisible and without collision component (for eg arrow that is visible only in editor) in your car component stack. On Event tick read that arrow WORLD location and apply to your other bp actor. Or even better make that code inside that actor, so it finds car gets world location of that component, and applies as self location.
Now vector math version.
Store relative location as vector, there is small checkbox that lets you se its location in 3d viewport. lets say you named this as “rel_location”
on event tick read that relative location (its basically vector from center of car to that point).
get car WORLD location and rotation.
First rotate that “rel_rotation” vector by rotation you got from car
now add world location of car to result.
You will get location where you should put that second object.
The vector math version is EXACTLY what I did. You can see that on the screenshot of the blueprint code I just added. But that solution gives me a wrong result (you can see that on the link i posted to a gyazo video). I wonder why the result is incorrect like that. Something seems off, but I can’t point my finger at what.
The question I have is probably how to rotate a vector on tick? The only node I can find is rotatevector, but this applies the rotation of the platform again and again each frame making the white cube spin out of control. So what I did is only apply the change in rotation between frames, but perhaps that is what’s causing the issue?
So assuming in your case you want the world position of a relative location on a given vehicle.
Use the transform of the vehicle as the reference origin orientation.
Lets assume you want the world position of the relative location (0,0,50) on the vehicle
Just Use TransformLocation on the Actor Transform:
BTW - Depending on your specific needs, a very common approach for this is to just create a socket on the static mesh or skeletal mesh, then simply reference the socket location. You can easily create the socket in the skeletal or static mesh editors.
I’ve tried a lot of different approaches. But none do what I require.
The only way I can make my system work is if I can find the math needed to rotate a relative vector using the rotation of it’s “base/parent”
Can someone help me figure out the matrix math please?
What I need is the following:
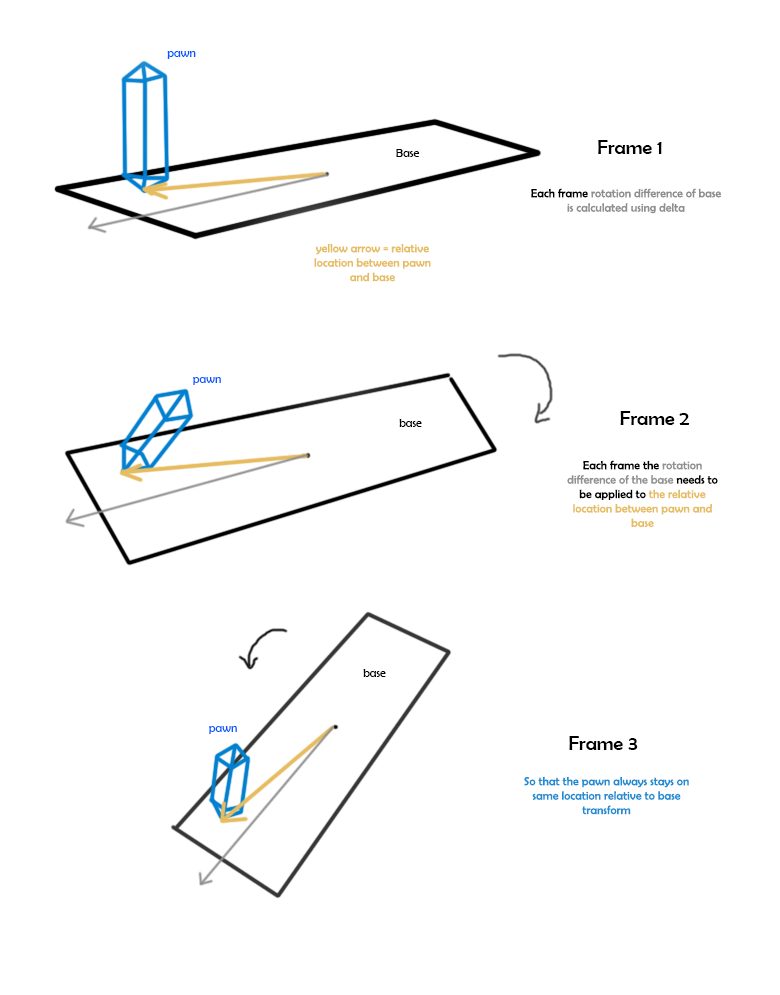
I calculate the delta between frames of the base / parent.
Each frame I want to apply this rotational difference to a relative vector (vector between relative object location and base location)
Use an InverseTransformLocation and InverseTransformRotation node. Plug in your vehicles world transform into both nodes, and plug in the intended object’s location and rotation. Use the resulting location and rotation to save a transform variable (this is to be initialized at the start of the psuedo attachment). Then you break out the location and rotation from the saved transform variable, send those through a TransformLocation and TransformRotation (not inverse this time), still using the vehicle’s world transform in both nodes. Take the results and apply them to your intended object with SetActorLocationAndRotation or SetComponentWorldLocationAndRotation; this node should be updated every tick.
Here’s two versions to run with either Tick or a looping timeline:
I actually use another version of this to interact with actors and objects in a VR environment. Works much better than any attach/detach method since you can also force a slowness of movement if you change the output with a Vinterp node. Among other things.
The problem in my case is that the pseudo attachment is not supposed to always stay at the exact same location. The pseudo attachment is a controllable pawn that can be moved around the surface of the vehicle. How would I go about addings this functionality to your system?
I think you’ll have to get creative with your tick update order. Your pawn position has to update first, then save the transform, then update the vehicle’s position, then apply the psuedo grab. Hopefully it will be fairly simple to add.
If the pawn has to leave the vehicle and jump into a new vehicle at some point,
then I’d have a bool that can stop the pawn from updating itself and then take a custom event (let’s call it VehicleTick) that gets called by the vehicle.
In the vehicle event graph, sequence node off of tick,
then sequence output 1 will call VehicleTick,
then sequence output 2 will save the transform variable,
then sequence output 3 will update vehicle position,
then sequence output 4 will apply the psuedo grab.
You may have to change the nodes that drive your pawn position and rotation. Instead of using axis events, you would just use the get axis variables (green wires) so that every pawn movement node is running off of one tick wire; just makes it easier to branch node. Or all the axis nodes could branch, I guess.