Hey DefNique, that’s really great!
Could you go into detail as to how you achieved this flat lighting model?
That looks awesome. Is that blue a solid color (light/dark from lighting)?
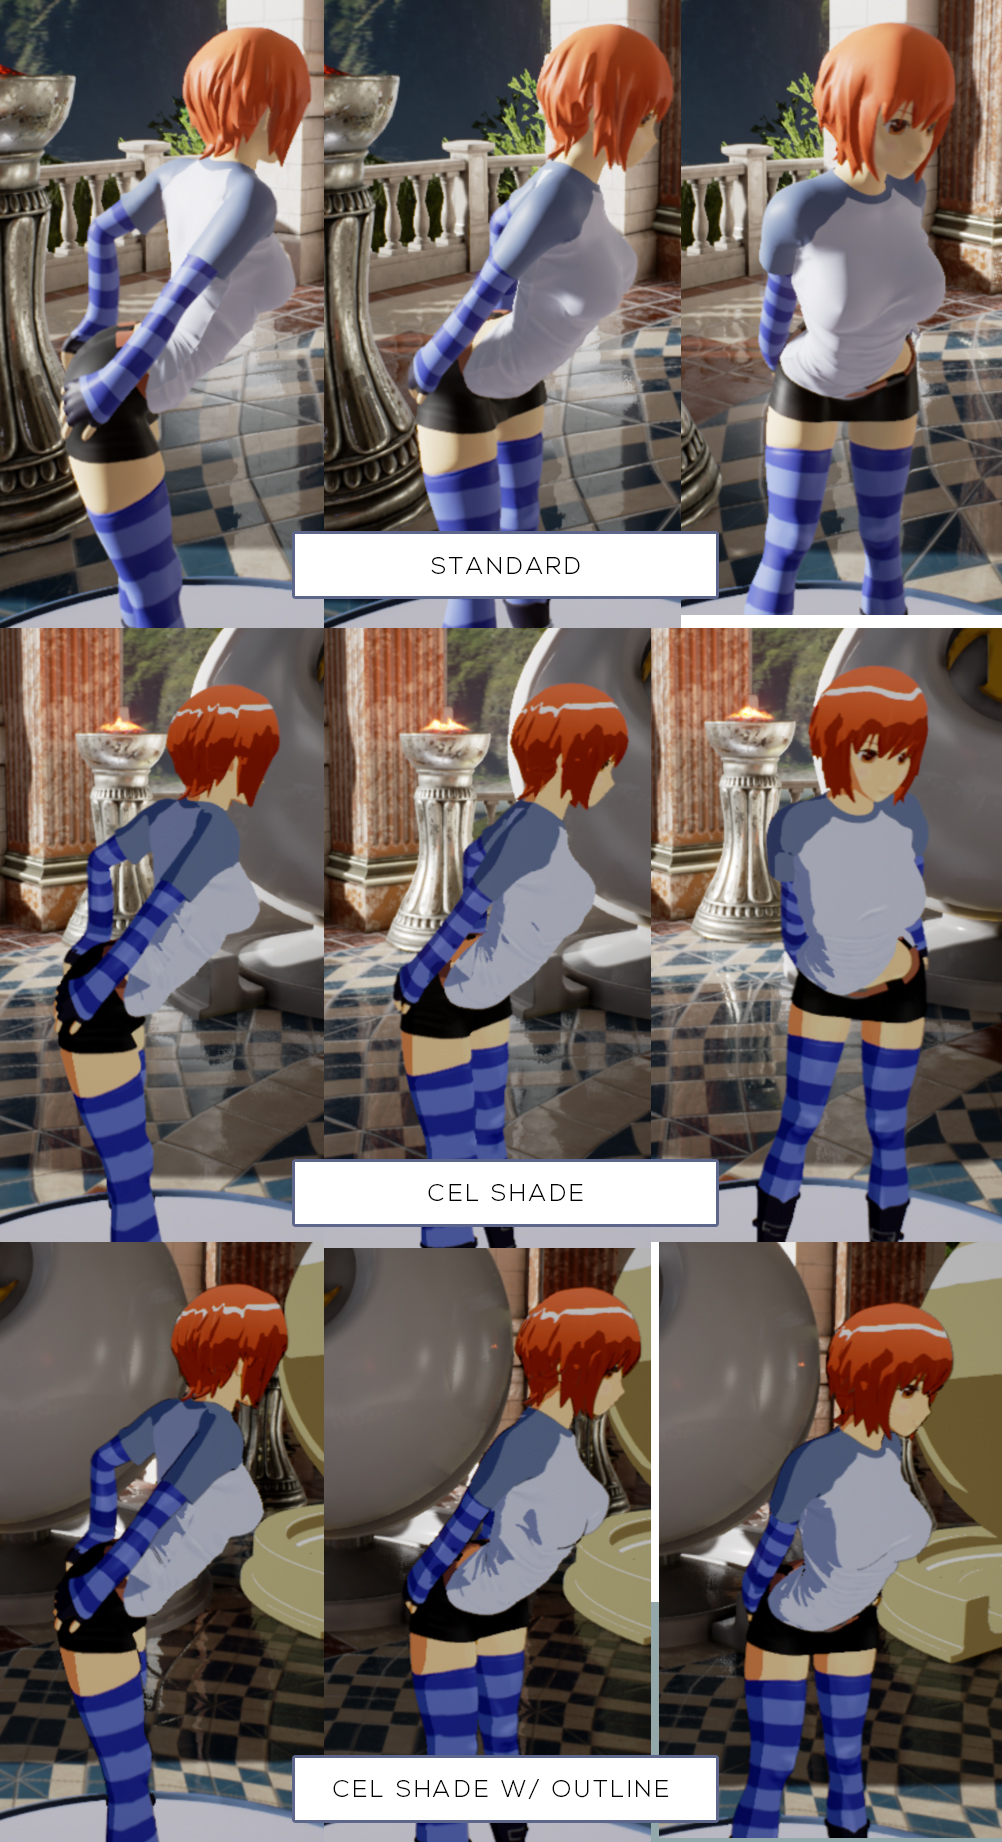
I kept seeing all these posts on various forums claiming this can’t be done because Unreal 4 uses deferred rendering, but really you can write whatever shading model you want in an unlit material and light the surface however you want. It’s a shame someone at Epic decided to label it unlit rather than constant. This is entirely doable in the material editor without additional programming and is actually a lot more simple than most shaders. My node graph has more nodes creating parameters and managing the material interface than nodes that generate the look.
How it’s done is by treating the final output like layers of paint on a acetate cel rather than thinking of it as a lit 3D surface. In shading the surface what you are actually trying to do is build up a series of black and white masks that you fill with whatever texture or color you want, and you composite them together.
This is a really great talk from Junya Christopher Motomura about Guilty Gear XRD that is clear and I think very insightful for anyone interested in non-photorealistic rendering. The core point beyond the nuts and bolts of the technical implementation is that when doing something like this you want to control every aspect of it and not leave it to the shader to generate.
For this shader you can start with something like a Phong or Blinn shading model. So get your vertex or pixel normal and a light vector, normalize them and do a dot product. This will give you a 0-1 value. You take that value and based on a threshold parameter that is either a simple scalar or angle if you prefer, fill it with color or a texel representing a lit area or a shaded area. Lots of attempts at this sort of shader use one texture or surface color and let the shader modify it’s HSV for shaded areas which is not going to give the result you want. Very important that the artist choose what colors fill the area explicitly. You can get pretty nutty with your look if you think of it as color compositing a 2D image rather than shading a 3D model. This cel look might be the most simple thing to do with the concept.
The outline is even more simple. It’s an inverted surface that scales the normals based on camera distance.
You can build up from there, but really that’s all there is to the shader itself.
The second part of it is modeling and texturing. The artist has to model for the shader. This means paying attention to silhouettes and probably using a lot of extra geometry to ensure nice smooth surfaces. It also means using less geometry in some areas. The artist should avoid continuous surfaces that go from convex to concave over short periods if the camera is going to be close to the surface. This means for something like a character’s mouth, the artist will model a shallow divot with teeth and a tongue rather than a deep mouth cavity. The artist will also have to manipulate normals by hand. This is covered a bit in the video. You will want to control what areas are always in shadow and probably try to prevent some areas from shadowing. UVs are taken advantage of to create interior ink lines. Also covered in the video. Basically the artist has to be careful about how the model is atlased to determine where the interior lines are and how thick they are. The UV atlases are squared off so the edges always run parallel to texel boundaries in the texture map. This will give you crisp interior lines.
I’ve got a bunch of other non-photorealistic shaders and some post processes I’m working on as well. I was planning to put them on the marketplace with some documentation.
Shaders/PP are really not a strong point of mine, so I’d be very interested in that asset! If you don’t already have a WIP thread, I’d love to see one to keep track of your progress.
Hi Defnique, I’m also working on a stylised render and was interested in your technique. I’ve got some decent(ish) results using a post process material but per shader control is what I’m after.
The part specifically in your post that I’m having trouble with is using a Light Vector Node which flags up a Error [SM5] (Node LightVector) LightVector can only be used in LightFunction or DeferredDecal materials. So is it possible to use this node on a surface shader?
p.s thanks to all the previous contributors on this thread - there’s lots of good stuff on here!
I gave it a shot. This is what I got:

The blueprints for the blendables got really complicated really fast, but I have a breakdown here:
Sorry for missing this. I have two methods in my shaders. One is just a vector parameter that the user can use to specify the position of a fake light, the other is a switch parameter on the material that connects a Material Parameter Collection to a light in the scene. The latter method I think is a bit kludgey and un intuitive, but it’s what you have to do in Unreal.
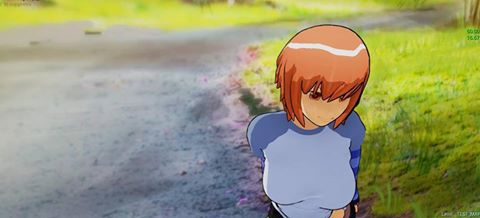
So glad this thread exists as it’s helped me loads in getting the Cel Shader I’ve been working on for a web series project of mine. It’s takes part of what Ogimafu did and combined it with some of the stuff that was used in Guilty Gear XRD. It’s far from being complete but here’s a pic of what the Cel Shader looks like using a generic run of the mill model as well as the same model using a duplicate mesh for the outline.
Here’s the same model on a handpainted background
Has anyone ever tried building an effect like this?

Cheers
Greg
wow, great! could you explain a bit the Guilty Gears process? i’ve seen the guide, about normals and custom AO and so… but i’m a bit lost and have no idea how to get it work ![]()
The normal adustment refers to manually changing the direction of the normals to alter how the lighting hits. That’s done in something like Maya or 3dsmax (or in their case, Softimage). The custom AO is just a mask that’s used to offset the lighting calc at runtime. The formula is pretty simple, take the dot product of the direction of the normal(adjusted in a DCC package) and the direction of the light + the offset mask(value from the custom AO mask).
The outlines are done by taking a copy of the mesh, expanding it a bit and flipping the normals. It’s actually an old skool technique. The downside of this method is that it inceases the amount of tri’s the system has to process. The upside for me is that it allows me to vary the color of the outline as seen in the attached image.

You can see that the outline for the hair is a different colour than that on the body. I haven’t been able to achieve this using the post processing methods. The added cost of having additional geometry to render doesn’t bother me since I’m currently building an anime web series using UE4 and a game later, so I don’t have to worry about performance right now.
Hi I’m Trying to create the cel shading post process that JVtheWanderer has created but i don’t seem to be getting any luck with it. I am using 4.12 and have tried it on previous versions as well (4.11,4.10,4.9). SceneTexture:Scenecolor just keeps coming up with an error and suggests that i use SceneTexture:Postprocessinput0 so i do that and i get a jittering post process. Also I do not know what im doing wrong with the material setup. Please Help.

So I followed the tutorial on the Japanese blog, here’s the URL to make things easy. http://ogimafu.blogspot.com.au/2015/04/ue4.html
I am using UE4 4.12, and I’ve checked things about 3 or 4 times but I have the exact the same setup, yet I get this outcome.

The character model has the custom depth pass enabled, and the only thing that works is the outline disappearance distance, meaning that it’s probably deciding to fill the entire thing with the black outlines. I have screenshots of my set up, which should be identical except for a few file names and no comments. Any help would be hugely appreciated. I’ve wanting to show my game for about a year in dev now, but not without any usable anime shaders haha xD
@Iby - You need to select your material output node, and in its’ properties panel scroll down until you see ‘Blendable Location’ under the “Post Process Material” category title. Change it from “After Tonemapping” to “Before Tonemapping”. Alternatively you can also fix it by disabling TemporalAA in your projects’ settings>rendering section.
@Zetaneko - I’m currently working on the same tutorial and I couldn’t see any differences between your pictures and the tutorials, though they did show some errors I’d made in my own attempt so I guess thanks for that even though it doesn’t help you out much. I do have working outlines though so it’s definitely strange. I did have the same problem as you have in UE 4.11 (I think it was - maybe 4.12.0) when I last tried the tutorial. Now I’m on a compiled from source 12.02 with toon shading implemented so I don’t know if this is making the difference (all my test objects are toon shaded).
@Daniel skipper Games ok so i changed the tonemapping and disabled TemporalAA. but it has stopped the jittering problem but disables cel shade on the test objects but only works on the ground and walls. another thing i noticed with the post process is that it only works with the directional light. when i put in the point light the test objects doesn’t get affected.
I’m afraid I can’t help you with your new problem Iby, however just to say that since you set the tonemapping then you don’t actually need to disable TemporalAA as well.
@Daniel - I’m using 4.12.04, and I had 12.02 at the time of taking that screenshot. I’ll try investigating it further, but for now I’ll just try another outline method.
Just wanted to warn people that (for me at least) TemporalAA actually plays havoc with the outlines even with the tonemapping settings changed once a character starts playing animations (looked perfect when characters were standing still).
After lots of modifications to the outlines with no changes I decided to try the AA settings and as soon as I tried either FXAA or None then the outline breakup stopped and I got really good, crisp results.
Whether an end user/viewer actually notices the lines breaking is of course another matter but figured I’d post this to spare people the pain of spending a day hunting non-existent bugs in their materials.
What do you guys think of this? Looks awesome
Zzt-83cgok8
Zzt-83cgok8
I wonder when Defnique will release his shader…
That shader looks pretty nice. Although I’m wondering why it needs a specific floor material. Tempted to pick it up to for testing.