Hey just been curious about how the camera stuff works. I’ve been looking at the examples, but now I’m wondering how one would lets say cycle between 2 different camera options. I know how to add cameras via the component parts, but I’m wondering how to switch between them. I’m assuming this is probably pretty easy, but haven’t found anything via Googling so I thought I’d ask here. Thanks in advance 
Hi Wisdomcube,
You can choose different actors to view by using SetViewTargetWithBlend on PlayerController.
Note: It’s not currently possible to pick between two different camera components on the same actor in a blueprint, though you can override CalcCamera in C++. If you want to switch between different views in a blueprint, you can move/adjust your camera component around (e.g., between two set points) yourself.
Cheers,
Michael Noland
Ah ok, I got something working now. Thanks for the help
Hey was just about to work on this again, but I’m curious about something before I go diving in at it. Is this camera setup possible in blueprint:
It would entail three different camera setups/controls, that the player could cycle through.
FPS Camera that uses the third person body but hides the head so that the player still has a body. Kinda fakes it in a way.
TPS Camera that uses a locked in over the should view similar to Gears of War or the more recent Resident Evil games.
TP Camera, would work almost identically to the sample third person blueprint you guys provided.
Based on what you told me, I need to use just one camera, and move it around for each mode, but can the controls be modified to support this? I hope I’m wording this in a way that makes sense here lol. Sorry if I’m failing there 
So does this sound possible to get all three working together? And if so anything I should make sure to use/look into? Thanks again in advance
If you’re doing this through blueprints you’re probably going to want to have a branch in the response to each input binding that treats the inputs differently depending on which mode you are in. In C++ you would probably do the same, but it would be possible to have three different InputComponents with different bindings that you swapped on your Character as you changed modes.
As an update, I’ve made a change to the camera component selection code in AActor that will be in 4.1.
As of CL# 2037260, AActor::CalcCamera now picks the first active camera component it finds, so you will be able to call SetActive to activate/deactivate different components to switch between them.
Cheers,
Michael Noland
This will be very useful. Thanks.
Hey that sounds pretty useful.
Is there any timeframe you can ballpark that update around? My apologies about asking for release times (I know you guys are probably working very hard), I’m just curious if I should hold off on what I’m doing atm and wait for that update. That said, keep up the good work ![]()
Hi Wisdomcube,
Not sure what the timeframe on 4.1 is, but I think we’ll be pushing a snapshot of the main branch to GitHub in the next few days, if you’re building yourself. The changes aren’t major, basically setting bAutoActivate = true in UCameraComponent::UCameraComponent and the following replacement for AActor::CalcCamera:
void AActor::CalcCamera(float DeltaTime, FMinimalViewInfo& OutResult)
{
	if (bFindCameraComponentWhenViewTarget)
	{
		// Look for the first active camera component and use that for the view
		TArray<UCameraComponent*> Cameras;
		GetComponents<UCameraComponent>(/*out*/ Cameras);

		for (UCameraComponent* CameraComponent : Cameras)
		{
			if (CameraComponent->bIsActive)
			{
				CameraComponent->GetCameraView(DeltaTime, OutResult);
				return;
			}
		}
	}

	GetActorEyesViewPoint(OutResult.Location, OutResult.Rotation);
}
[edit] Also removed the HideCategories Activation bit in CameraComponent.h, or you won’t be able to actually see SetActive 
Cheers,
Michael Noland
Ah thanks for that, though I’m personally trying to stick with blueprint atm for everything (I’m not the best programmer lol).
A side note though, my friend and I have been going through with the setup I mentioned earlier, and we hit a bit of a snag. We based the camera off the third person blueprint, and were able to get the fixed thirdperson over the shoulder view, and the Third person view that you guys included (Though we added some basic zoom functions). The problem is with the first person mode.
We were trying to follow the basic approach that we saw in the TrueFirstPerson thread that we found here on the forums. In order to get it setup like theirs, we had to detach it (the camera) from the camera boom then attach it to the socket we made on the TPP mesh/skeleton. Problem is that at first the camera couldn’t rotate at all, so we added 2 set to enable use the controllers yaw/pitch. This fixed the stuck/frozen camera, but it also now rotates the entire mesh when you look around. So say if you look at the ground for example, the player mesh instead of standing upright, is now horizontal and face down looking at the ground.
Note sure what we did wrong, and my friend won’t be around for a few days to help me figure it out, so I’ve come here hoping someone can explain to me where I made a stupid mistake lol. Thanks in advance as usual ![]()
Forgot to add some pictures to help people understand what’s going on. This is the last part of the camera I need to get working, so I hope someone can help me out here
Pic of the FPS part of my Blueprint. It uses a socket that I made off the Head bone.

And a pic of what happens in game, with what I mentioned earlier. I moved the camera some to show the player mesh in the shot.

@WisdomCube2000 // Just a shot in the dark here, but it would appear that your mesh is attached to the camera, instead of the camera being attached to the mesh. From my experiments with working on fine tuning TFPS the Skeletal mesh should always be the base.
Isn’t that what I’m doing with the attach to node? Or do I not have that set up correctly? I mean first it disconnects from the camera boom of the thirdperson setup with the disconnect from parent, then it uses the attach to node to parent it to the mesh/socket. Is that right? or am I really missing something here lol.
Ok, went back a bit and changed my setup some to make it finally work. It was an issue with the parenting, which I thankfully was able to fix, so a big thankyou to you Arixsus. ![]()
It now has:
A fixed over the shoulder camera (TPS)
A free rotate and zoom camera (TP). With limits on how far/close it can move.
A socketed First person camera using 3rd person body to simulate a true(r) first person.
There is some clipping with it atm in the FPS Camera simply because we used the sample body mesh provided, so that won’t be present when I swap it out for custom assets. But as a proof of concept, it works so I’m happy.
All assets shown are from the 3rd Person Blueprint that Epic provided. So special thanks to them for providing such great tools, and thanks to a friend of mine who helped me out quite a bit with it as well ![]()
This was surprisingly made in under a week with about 7(ish) hours total of work, it was also our first time using Blueprint as well. Really awesome job you guys did with the Blueprint system. I’m loving it so far ![]()
Here’s a video of it in action:

Glad you got it figured out and its looking good. I’ve been working on implementing the first person arms onto the 3rd person mesh, and I had plans on working on alternative camera systems that the player could switch between such as having different cameras for different weapons. Such as a Heavy weapon putting the player into 3rd person over the shoulder camera perspective. I am curious as to how you handled the different cameras via blueprint if you wouldnt mind sharing some information that would be great! ![]()
Yeah my friend wanted to make some tweaks to it before he calls it finished as well, but once he’s done with that this weekend I can try and walk you through what I…err…we did lol. Just want to make sure I share the best possible setup, so future people looking at this don’t wind up confused/annoyed that there was a cleaner/better way of doing things. I’m a bit sloppy from what I’ve been told, but he usually fixes it up all nice. So yeah, I’ll try and get some pics of it soon for you guys!
Right on! I feel you on that, I am very messy with my work and before I release it I want it to be readable to someone other then me haha.
Help
Nice Work Wisdom, I am Working on a project that need this type of camera possibilities, can you teach me or share with me your configuration.
Thanks in Advance
Ok didn’t get to mess with this like we wanted to (He has been busy), but here are those pic’s I promised. That said I cleaned it up a little still despite not getting him to work on it. Also still can’t get a smooth transition between modes atm, as I just can’t seem to get it working with this, at least by my lonesome here lol. This is a cry for help btw 


edit
Just noticed how low res these shots turned out to be…will have to retake them lol. Actually I may just make a video that glosses over all of them. That way you can see it all and just pause it when you need to. Will do this Tomorrow morning then
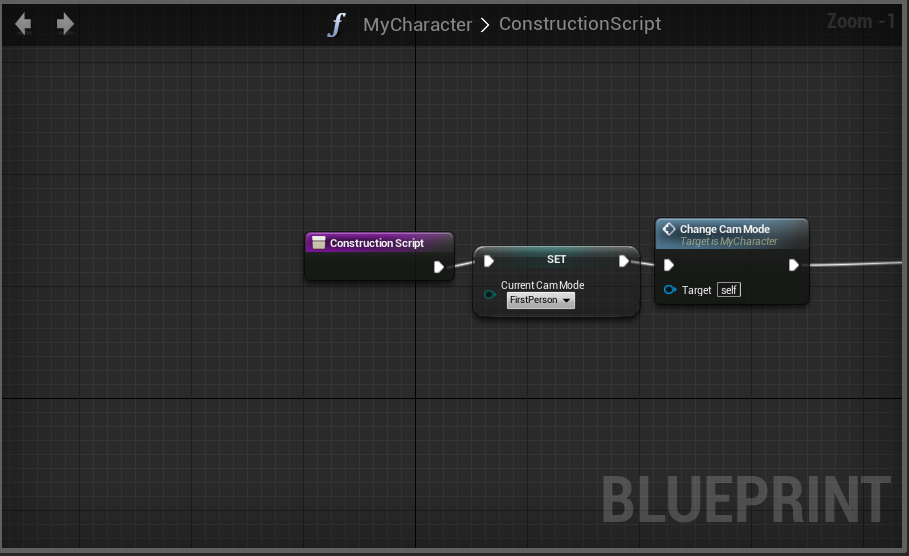
Alright found out why those turned out so low res. Was because I added them as an attachment from my comp. But anyway, here’s my setup via video, and the CS Script that I forgot to show in it lol.
http://i1132.photobucket.com/albums/m579/GC_madGin/CSScript.png (Can’t show here file is too Large)

But yeah still need help on what I mentioned before so if anyone has a clue on what to do, let me know lol. That said, I hope this helps the few of you that were asking for it ![]()