The Re-Inventing the Wheel Thread

hello there

Here is a car example with custom physics in the form of a plugin. It is the end result of discussions in this thread. The download link is a full project with an example car on a test level.
(there is no blueprint version)

edit:
LATEST VERSION HERE:

Updated to 4.22.3 / VS2017

Download link https://www.dropbox.com/s/lybjonssfg…04.22.zip?dl=0

right click the .uproject file and select generate project files, then open the generated .sln on visual studio and build it

what you will get is an updated version of this

1.either make or download your own car model
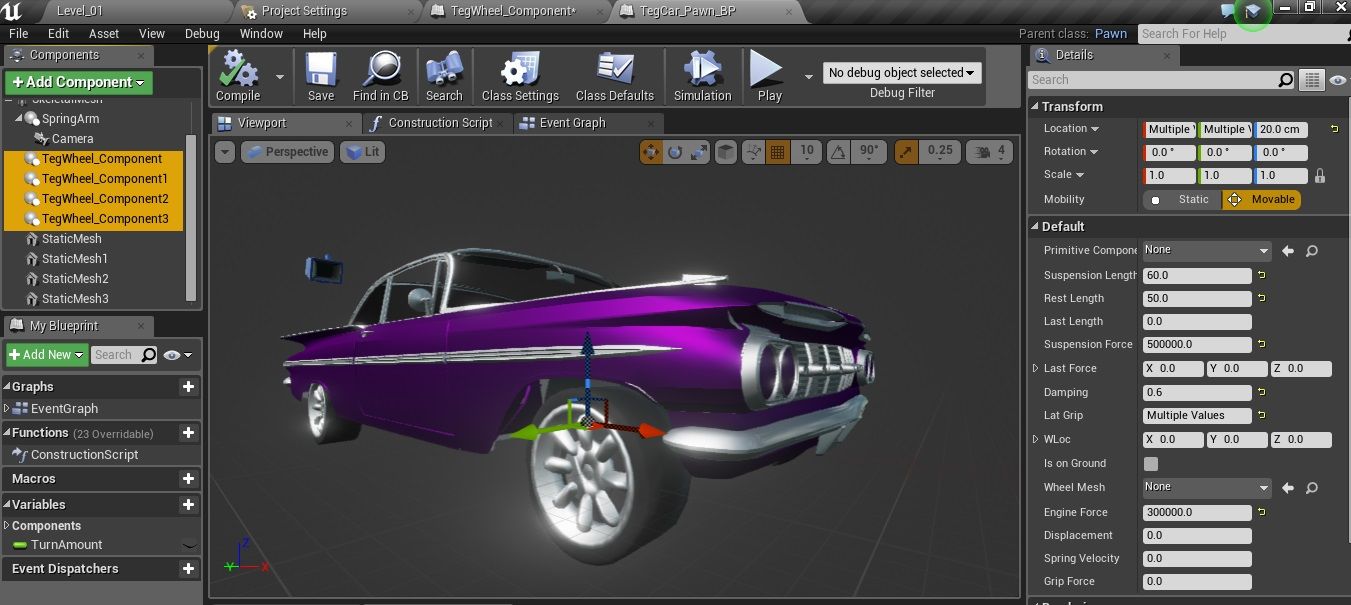
2. the car body needs to be a skeletal mesh with 1 single bone which will be the center of gravity.
3. the wheels are a single static mesh
4. either duplicate or modify TegCar 8 blueprint with your own car model
5. adjust spring, engine etc settings to suit
6. make an ace game

old edits below:


4.20.3 Version HERE

@vr_marco kindly updated and shared this plugin to compile under UE 4.20.3 / VS2017

Download link: CarPluginProject.zip - Google Drive


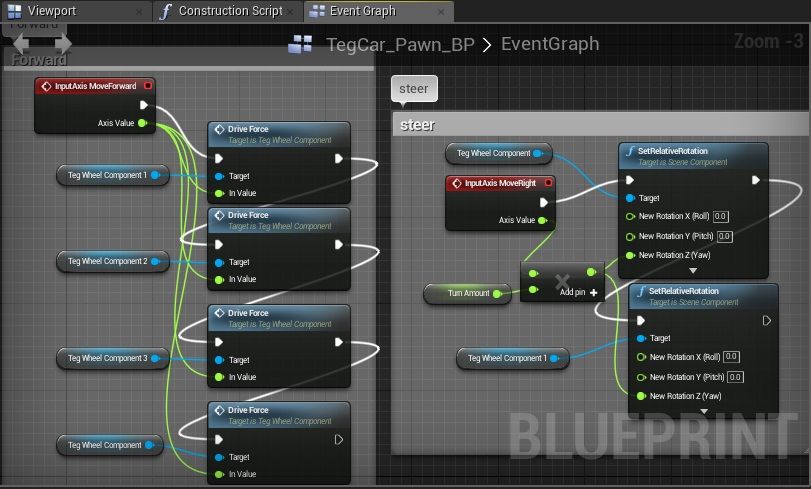
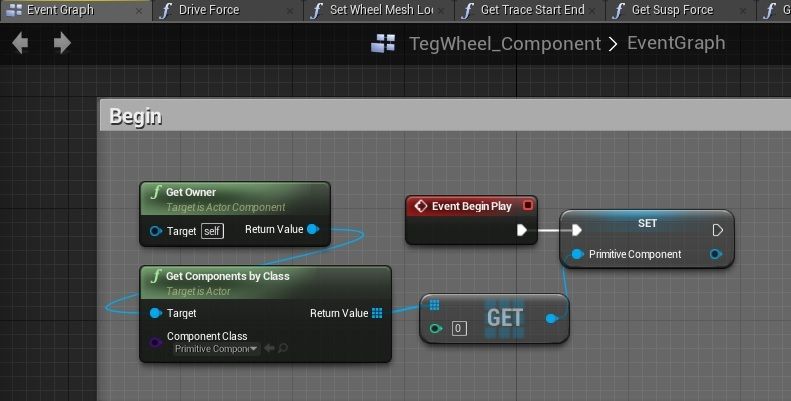
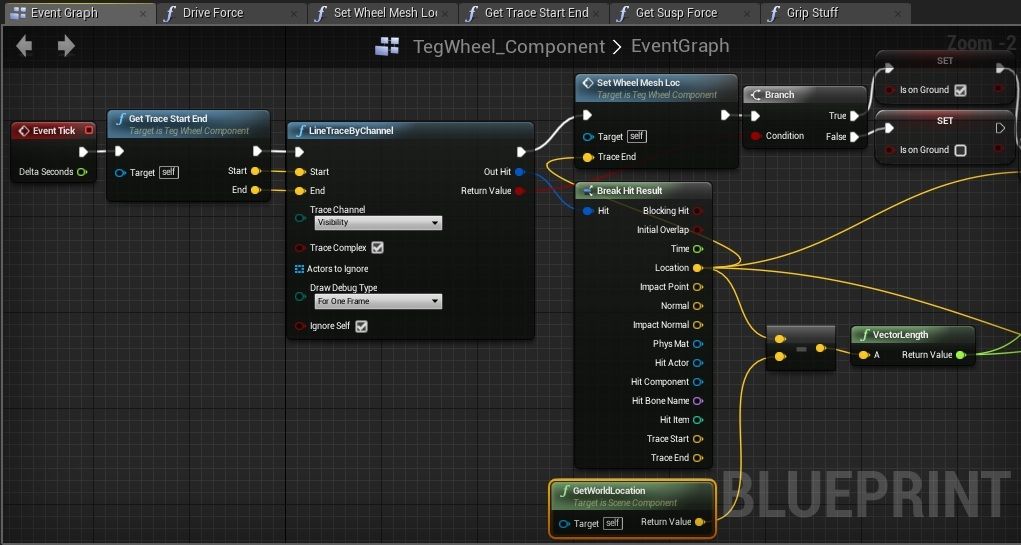
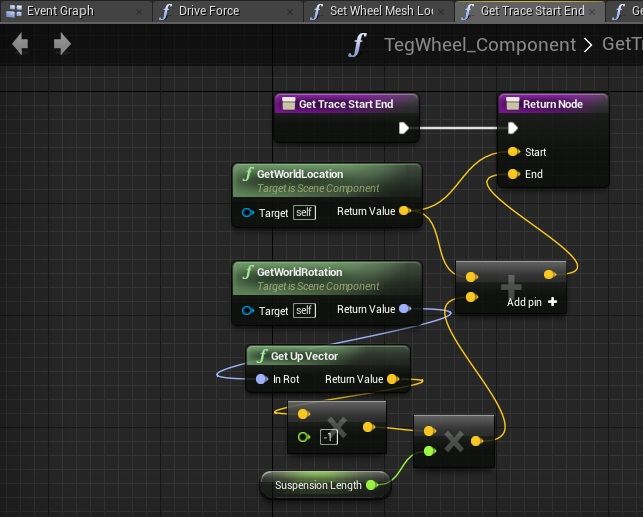
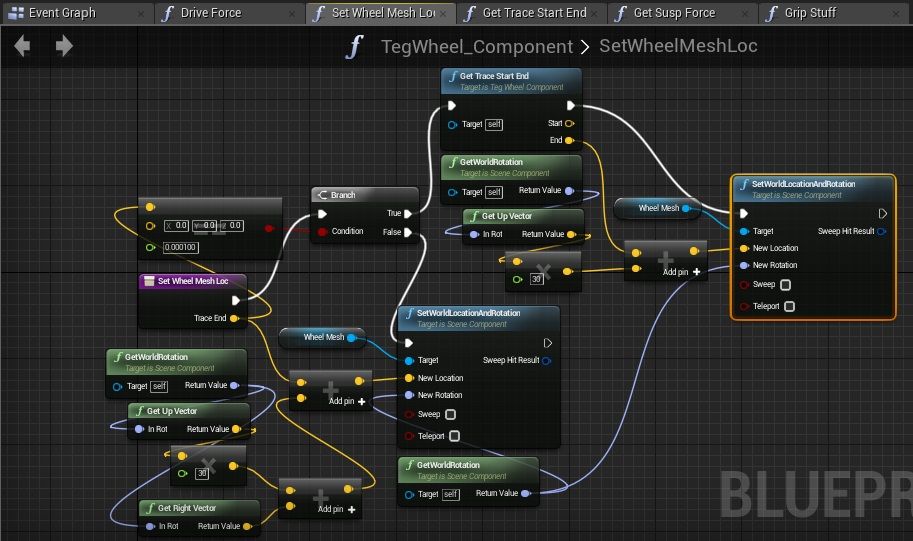
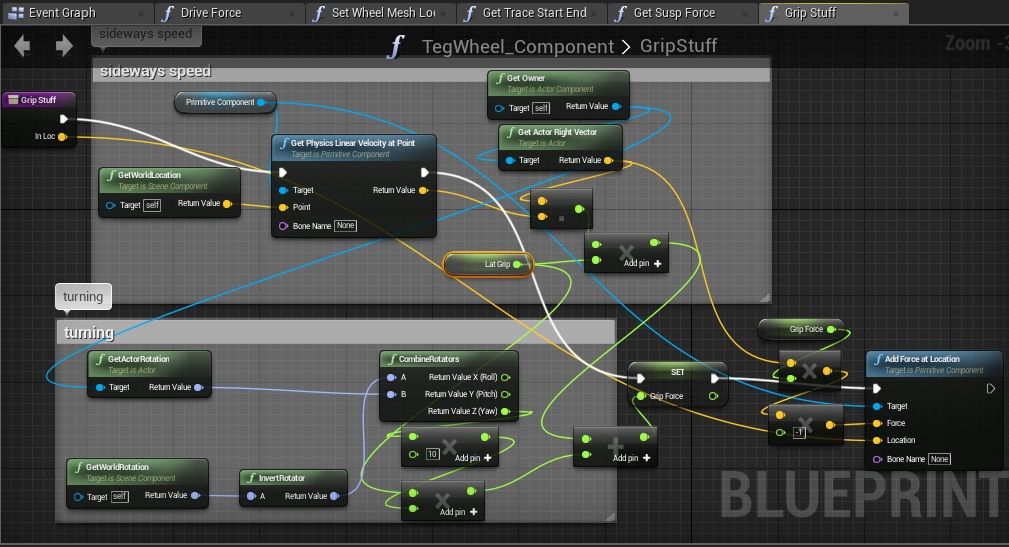
alright here is the last version of this i will give out. its a custom pawn class with custom 4 wheeled vehicle physics.
its the full project with an example car. the code is all nicely packed into a plugin so you can add it to your own project.
please feel free to use or modify it in any way you see fit. if you find a way to improve it please let everybody know on here.
big credits to and BoredEngineer without whom it would not have been possible :slight_smile:
CarPlugin v0.4

for UE 4.10 and VS2015
right click the .uproject file and select generate project files, then open the generated .sln on visual studio and build it

have fun

old vid here (v0.1) UE4 Car Physics Plugin - YouTube

old versions:
https://forums.unrealengine.com/showthread.php?48843-Horrible-Car-Physics

in that thread, 0lento was kind enough to provide some pointers and useful links.
https://forums.unrealengine.com/show…l=1#post396144
https://forums.unrealengine.com/show…l=1#post396237
https://forums.unrealengine.com/show…l=1#post396367
https://forums.unrealengine.com/show…l=1#post396409

im currently in the process of doing some experiments with blueprints very loosely based on the hover component tutorial.
nothing decent enough to show yet sorry.

if anyone has anything to add or ask please feel free :slight_smile:

thanks

alright, just to get something going here is my very ruff and experimental blueprint car so far.
i made a scene component for a wheel. added 4 of these to a pawn blueprint along with a skeletal mesh component and 4 static mesh components (with no collision) for the wheels.

in its construction script it assigns the wheel meshes to a variable stored in the wheel component.

in its even graph forward input is sent to the wheel components,
and the turn input rotates the yaw of the front wheel components.

wonder how many images im allowed…
ill carry on in the next post anyway to separate the car and the wheel

so the wheel component is like this
event graph begin

event graph (left hand side)

event graph (right hand side with overlap)

function Get Trace Start End

function Set Wheel Mesh Location

function Drive Force (called from the pawn input) no calculations for wheel spin or anything

function Get Susp Force, using a very simple formula a damping force of 0.5 is reasonably stable. still lots of room for improvement!
edit: blimey ive spazzed this up before i took a screenshot lol. oh well ignore this one then :slight_smile:

extremely hacky and rubbish tire grip function Grip Stuff, masses of room for improvemet

those last 2 functions, suspension and grip are the main focus of future improvements, i will post them here as and when.
please dont hesitate to speak up if you know a better way :slight_smile:

Heh, those blueprints weren’t really easy to follow, you may want to clean them up a bit as it’ll make your life easier later on. :slight_smile:

For the functionality itself, it looked pretty good, I’d change the logic on damping though as it doesn’t take existing velocity into account at all. If you look at this article: Spring Physics | Gaffer On Games it explains commonly used formula for it: F = - kx - bv where k is spring stiffness, x is the travel (trace length), b is damping coeff and v is velocity (be sure to start testing with really low b value at first so you’ll not overdo it). You are already doing this all, except your damping doesn’t use velocity.

To get the velocity, you can use the same method you used on grip calculations where you used “Get physics Linear Velocity at Point”, just use up vector instead of right vector on the dot product and you’ll get the springs up/down velocity (assumption here that spring isn’t in any angle).

I also suggest you to cache all vector values that you need more than once right at the start of tick/update. This will make your BP more readable and probably bit efficient as well. One thing to note that if you do all these calculations on tick, make sure you limit the tick update to some update rate, like say 0.1 which will make the force calculations happen only 10 frames per second, if you update them on every tick, you’ll get different results on different frame rates. This of course isn’t ideal but you can’t really control much of the update rates on BPs. On c++ you can do it like I described on the previous thread.

thanks
as i said its just a ruff experiment atm, ill get round to cleaning it all up as i go through it again.
i did use that exact formula F = - kx - bv, but while trying to tidy it up for the screenshot i deleted half of it, duh lol
i put it up really to get something going, or to show how it could possibly be done, ie scene component wheels.

Using scene components for suspension and/or wheels is a good idea and a lot easier to manage.

One additional note as I saw you used line traces per channels. I haven’t checked recently but earlier I had some issues to get that working on spline meshes (something to think about if you plan to use them for roads etc). I solved it by using line trace per objects instead and put both static and dynamic objects into that array it needs. After that you can handle stuff you don’t want to get traced by using custom collision channels (for example to disable traces for grass etc). I wouldn’t be surprised if there was a simple solution on that by channel-route, never bothered to investigate it further as it made more sense to use it by objects anyway.

i did come across that, thanks for the solution :slight_smile:

Will there be a tutorial?

if you can get it working properly feel free to make a tutorial :slight_smile:

atm it looks as if it may not be possible to create a decent suspension system entirely in blueprints, even with set tick intervals and various maths related hacks ect.
it seems like calculations need to be done in the physics sub-step, and i can find no way to do that in blueprints.
please prove me wrong someone?

It’s hard for me to create the blueprints just by looking at the screenshots of the blueprints. There is a node that says “SET” with inputs for wheel mesh and target. How do I set up my vehicle? The screenshot of the blueprint showing the 1959 Chevy in the viewport shows four wheel components and five static meshes (I think because the bottom of the list was cut off).

It’s not really possible to get responsive suspension using BP and line traces as you’d miss most of the fast changes on geometry. You should be able to get something less accurate though. I could see if I could clean up my old prototype built on BPs to give some ideas, but it’s definitely not something you’d use in actual game.

This is suspension force calculation I use for tracked vehicle:
05e0d98a4905a0637e04d5cd60755f3236988805.jpeg

Full suspension force consists of two parts
TotalSuspensionForce = SuspStiffness * (TargetLength - CurrentLength) + SuspDamping * (TargetVelocity - CurrentVelocity)
First part just multiplies compression ration of spring by SuspStiffness constant which main role is to setup a base line of how much weight will be supported. Good value of Susp Stiffness would place wheels somewhere in the middle of the total spring length.
Second part is damping based on velocity of the spring, it’s ok to have Target Velocity at zero, otherwise it will behave like drive motor (which might be desirable in some scenarios). Current Velocity is calculated from suspension length at current and previous time steps and divided by Delta Time. SuspDamping is set according to your liking, depending if you want a bouncier behavior or want to stop oscillation rather rapidly. The lower the value the longer oscillation will keep going.
To tune these constants I start with very high value for SuspDamping so oscillation is constantly killed. After this adjust SuspStiffness so that in rest position of the vehicle, wheel is somewhere around the middle of the spring length. Now SuspDamping can be tuned to something more realistic.
On M113 I have maximum length of the suspension at 23cm, SuspStiffness is at 4000000 and SuspDamping is at 4000. These settings are the same for all 10 road wheels and they support 10.4 tons of chassis.

Suspension length is calculated using SphereTrace, this is the function I use:
078f2274475ca52fdaf0fb697637d142865f9f7a.jpeg

The only difference with RayTrace is that you can use OutHitLocation as the end point of where suspension should be if wheel collides with something.

I have a full source on GitHub, everything is done using blueprints, feel free to check it if I missed something:

Did some reading today and it looks like using sub-stepping only helps to hide the problem but not really solve it. The real problem is in integration of the suspension force. When DeltaTime goes up our damping force becomes very small and is not capable of stopping oscillation until DeltaTime goes back to some small values.
The solution is to use a different mode of the spring and damper. Two that seam to be reasonable math-wise:
https://www.google.com/url?q=http://www.gamedev.net/page/resources/_/technical/math-and-physics/towards-a-simpler-stiffer-and-more-stable-spring-r3227&sa=U&ved=0CAcQFjABahUKEwjZnL2B1_nIAhUJej4KHda_Aew&client=internal-uds-cse&usg=AFQjCNF3UwTOc5tOwVndr3-sQ6QnLvGFXQ
http://box2d.org/files/GDC2011/GDC2011_Catto_Erin_Soft_Constraints.pdf
First method requires knowing mass, that suspension have to deal with, upfront, which is not possible for the car (for more than 4 wheels or under acceleration). But perhaps effective mass can be used instead, I’m not exactly sure how to calculate it, need to re-read second article again.

I don’t really see how this is an issue unless you need to use some really stiff springs and large delta time… …which wouldn’t be ideal in the first place. If you can guarantee that physics step is using fixed delta time, you can find safe operating range for spring forces. Of course you could handle the integration yourself with better integration method for this specific task (RK4?) if that really is a concern and do as many steps on your own calcs as needed to keep it stable. You can even inject your own velocity values to physx scene if you use c++ and substepping using https://github.com/EpicGames/UnrealEngine/pull/585.

To be honest, for regular vehicles on unreal, this does seem a bit like premature optimization/fool-proofing and I really wouldn’t worry about it beforehand unless you’ll find it’s actually causing you trouble.

In my latest demo it can be easily seen if you just set t.maxFPS to something around 20-30. Suspension of Ripsaw after spawn, just doesn’t stop bouncing at 15 fps. Take into account that it’s 10 suspension systems here, not 4 as on regular car. Car’s weight less, but as it can accelerate to higher speeds, relative mass will grow too and can be comparable to tank.
It won’t be enjoyable experience to play game with such refresh rate but the point is that occasional dip in fps can lead to abnormal behavior of vehicle physics. I’m not even taking into account possible replications issues and hack detection. Adding sub-stepping won’t really help because setup of suspension depends on DeltaTime. It means it will behave differently, more time steps can only mask it. This isn’t really about physics bug but how controllable vehicle will be.

I realized that what I said was only if you do fixed time steps for substepped physics. If you use substepping as is, you can have potentially situations where you’d get bigger delta times, so sorry if I misunderstood the original point :slight_smile:

Are you talking about adding substeps but not applying the suspension forces on the physics steps itself? I think so, as your example is BP only. For example I’m doing my current prototype’s vehicle suspension force updates at 100 steps per second at the moment and it’s pretty responsive. I update the suspension calcs on each substep. If I updated those suspension forces only 20-30 times per second, I’d lose most of the benefits of using substepping and it wouldn’t solve the inaccuracy issues at all, 10 times per second wouldn’t work at all and would result in forces overshooting all the time. Of course if you are using only blueprints, you don’t have much options and you have to live with less optimal update rates.

But that’s the thing. Regardless of how many physics update steps per second you run. If you tune your spring parameters to 50 fps, it won’t behave the same at 25 fps. It’s not about accuracy but magnitude of forces which are produced. This is not the case where at 100 fps your suspension force will be fluctuating at some decimal number and at 25 fps it will be an order of magnitude higher but the case where value will be totally different. The reason for this is because first term of spring and damping equation can change rapidly regardless of your fps - if vehicle drives over the box on the road, the length of suspension will change as fast as wheel hits the box. In case of vehicle falling on the ground, the lower your fps the higher spring force will be as difference in spring length will be higher at lower fps. This means that “smoothness” of the suspension is related to your fps, combined with weight distribution because of change in acceleration the driving will just feel different. It might look just fine and don’t have any visible glitches but controls will feel different.
Your approach will work just fine for a lot of use cases, especially if you can enforce a certain min/max frequency of physics update. I’m just looking into more general case of using physics in games like Bad Piggies or Kerbal Space Program, where you would have to build a different vehicle to solve the puzzle just because there is performance difference between your laptop and PC.

I think I lost the point here, if I run physics at fixed 100 steps per second, I don’t really have to take any other scenarios into account, I just tune the values to behave well at 100 steps on physics engine and it will run the simulation the same if target hw renders graphics 10 or 120 frames per second (as long as physics engine keeps up and we don’t take floating point inaccuracies into account).