My brother & myself are taking are first steps at UE4 world.
He has modeled a gorgeous-looking piano in Cinema 4D.
We are now at the step where we want to correctly import it into UE4.
It tried the most direct approach of just importing it - but it is imported with a lot of errors & warnings.
Also - if I do ‘combine meshes’ it is all one single mesh in UE4, and I can set only 1 material to it.
If I don’t do ‘combine mesh’ - it imports it as 100 different meshes into UE4 (e.g. - one mesh for each piano key).
Can the gurus here who have knowledge in Cinema 4D help us out and guide us how best to import it into UE4 ?
Also - has everything in the FBX model file been exported correctly from Cinema 4D ? (UV maps, light map, materials, textures, etc).
You should combine it all to in to one mesh. Don’t know about Cinema4D but in Blender/Modo/Max/etc you can assign materials to different ‘regions’ in your mesh.
Hi BlackLeopard, good job with the piano (well modeled).
I downloaded your model and imported in Unreal with the option “generate 2nUV channel” enabled and “combine mesh” disabled…seems to be all ok, now warnings except the ones referring to the small object imported…but it’s just a warning, not an error.
As you can see the piano was corrected imported andlighted without errors
Hello Martin & paoloverona
first of all thank you for the quick response.
Martin - I have tried combining all mesh but in the unreal engine it seams to import it as seen in paoloverona’s image without the textures that appear in the first photo’s.
How can i import the object with the textures on top of it?
paoloverona - if you look at the first photo’s the object is textured and in your photo there are no textures.
I have also managed to import the object with no textures… the question is how to import with all the textures on top of the object?
Ue4 cannot import materials, only the diffuse texture and it won’t be applied by default. It will just be next to your mesh in the content browser! Then you convert the texture to a material and tweak it there!
I’m pretty new with unreal too so my answer probably is not the correct one.
I’ve imported your piano in both methods (“combine meshes” enabled and disabled)…both succesfully ended with no problems as for overlapping UV (except warning of lot small objects when importing single objects).
In both ways, no texture found in no one of the materials of the piano (how many materials have you created? I’ve imported almost 15). I made a test creating a material with a texture applied, that before export the geometry, The texture was moved in another folder…the FBX come out without texture information, like your piano)
Maybe the problem could be that at the time of exporting from C4D and creating the FBX file, the “system” cannot find the texture (…maybe was moved from where it was originally) or simply couldn’t “load” the path to it and so the material is empty.
Hope that this could be of help
Don’t know to which version of Unreal you are referring to, but, at least for the 4.7, you are partially right heartlessphil: UE can import materials, the trouble is that even if you create a simple diffuse material or a complex transparent one, Unreal will convert it in its own “basic material” (non extra texture or effect will be recognized except for the diffuse channel…and its texture will be automatically attaced to it…this happens to me).
If you don’t “define” a material externally, at the time of import the mesh, Unreal will create an its own standard material whit a “generic” name applied (that should be pretty soon be changed choerently to its function)…This means that it’s correct to set “externally” a set or sub-set of materials (I often use multi-sub-object material in 3DStudio) , but they should be defined only as standard material with a simple color or texture attached only to the diffuse channel (the other channels won’t be recognized) and used only as “reference poin” just to be faster in organize and set definitively in Unreal
You could considder this a highpoly version, but not a game ready lowpoly mesh.
First of all, there are 70.145 vertex points and 63.277 polygons in the fbx, which is far to many for a model like this.
Even by just combining meshes and using the optimizing command to weld vertexes of the combined meshes together, you could possibly save 10.000 Vertics and polygons.
Things like the hinges, locks and other tiny details could be much less detailed or sometimes even just textured, others are not neccessary at all.
Bevels could have less subdivisions. Also most of the other shapes would be achiveable with much less polycount, without noticable visual difference.
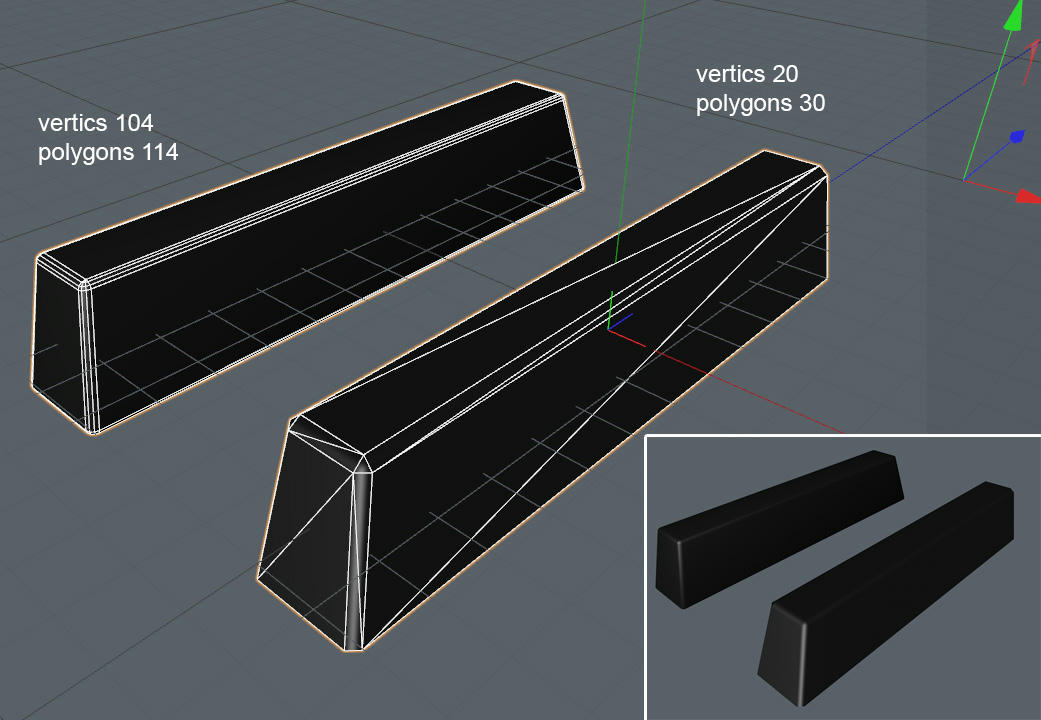
Take the black keys for example:
Your version on the left, mine on the right.
(note that the polycount on your model will be 204 after triangulation, while the vertex count remains the same, while mine is allready triangulated)
However, my version has only 1/5 of the vertics and less then 1/6 of the polycount.
Visually it will never get bigger then on the render in the bottom right corner, i guess it won’t even get that close to the camera.
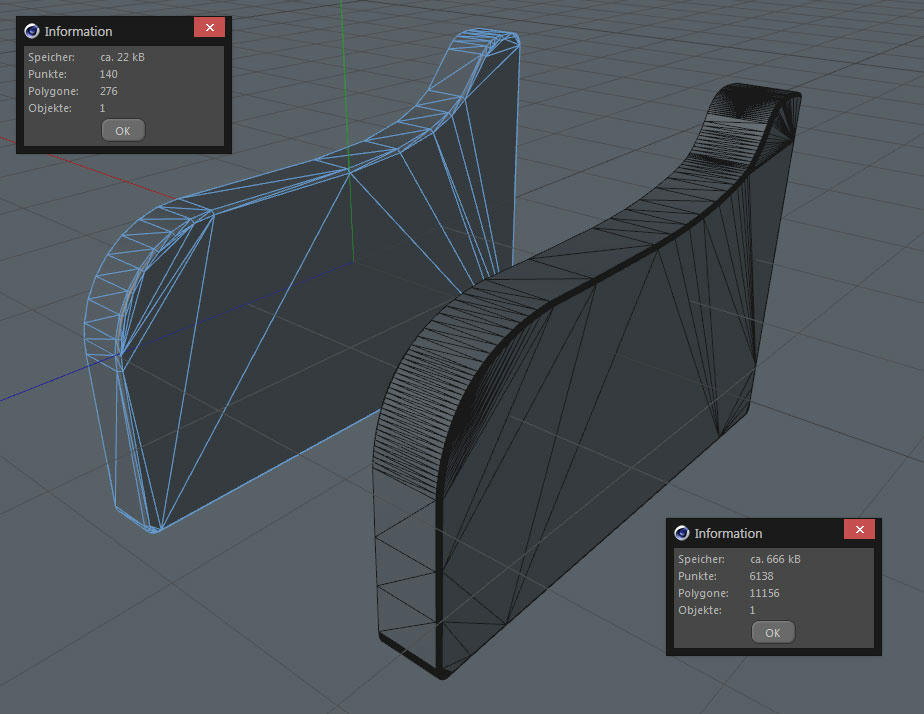
Example 2: (mine left, yours right)
Render:
Quite a big difference in polycount, isn’t it?
Also stuff like the wheels, that never will have the chance to get close to the camera, could have much less polycount and detail.
Reducing polycount and most other things are always done before triangulating a mesh.
Simply because it’s easier and faster to work with quads and things like removing an edgeloop can only be done efficient that way.
As for Materials, it depends on the model and the circumstances it’ll be used in.
For example if you only assign plain colors like piano black, gold for the handles and white for the keys, you might be able to get away without baking texture maps.
In that case you’d just create material selections and use them to restrict materials to certain model parts.
I’d still create an UV layout for these Parts because if you ever want to apply more detail e.g. little scratches and finger prints on the piano black, it’ll be needed.
Also you’ll need a UV Layout for the lightmap anyway.
As soon as anything like a normalmap gets involved, you need to pay a lot attention to the UV layout, otherwise your normalmap will bake wrong.
But i’d say: cross that bridge when you get there.
In case of using a texturemap like your wood texture above, you surely need to have that UV map set up correctly.
You can bake several materials with selections and different projection methods (cubic, cylindrical, etc.) to a single UV map if needed.
Honnestly, this topic is quite huge and i cannot tell you everything in one post, so feel free to come back if there are new questions and/or issues.